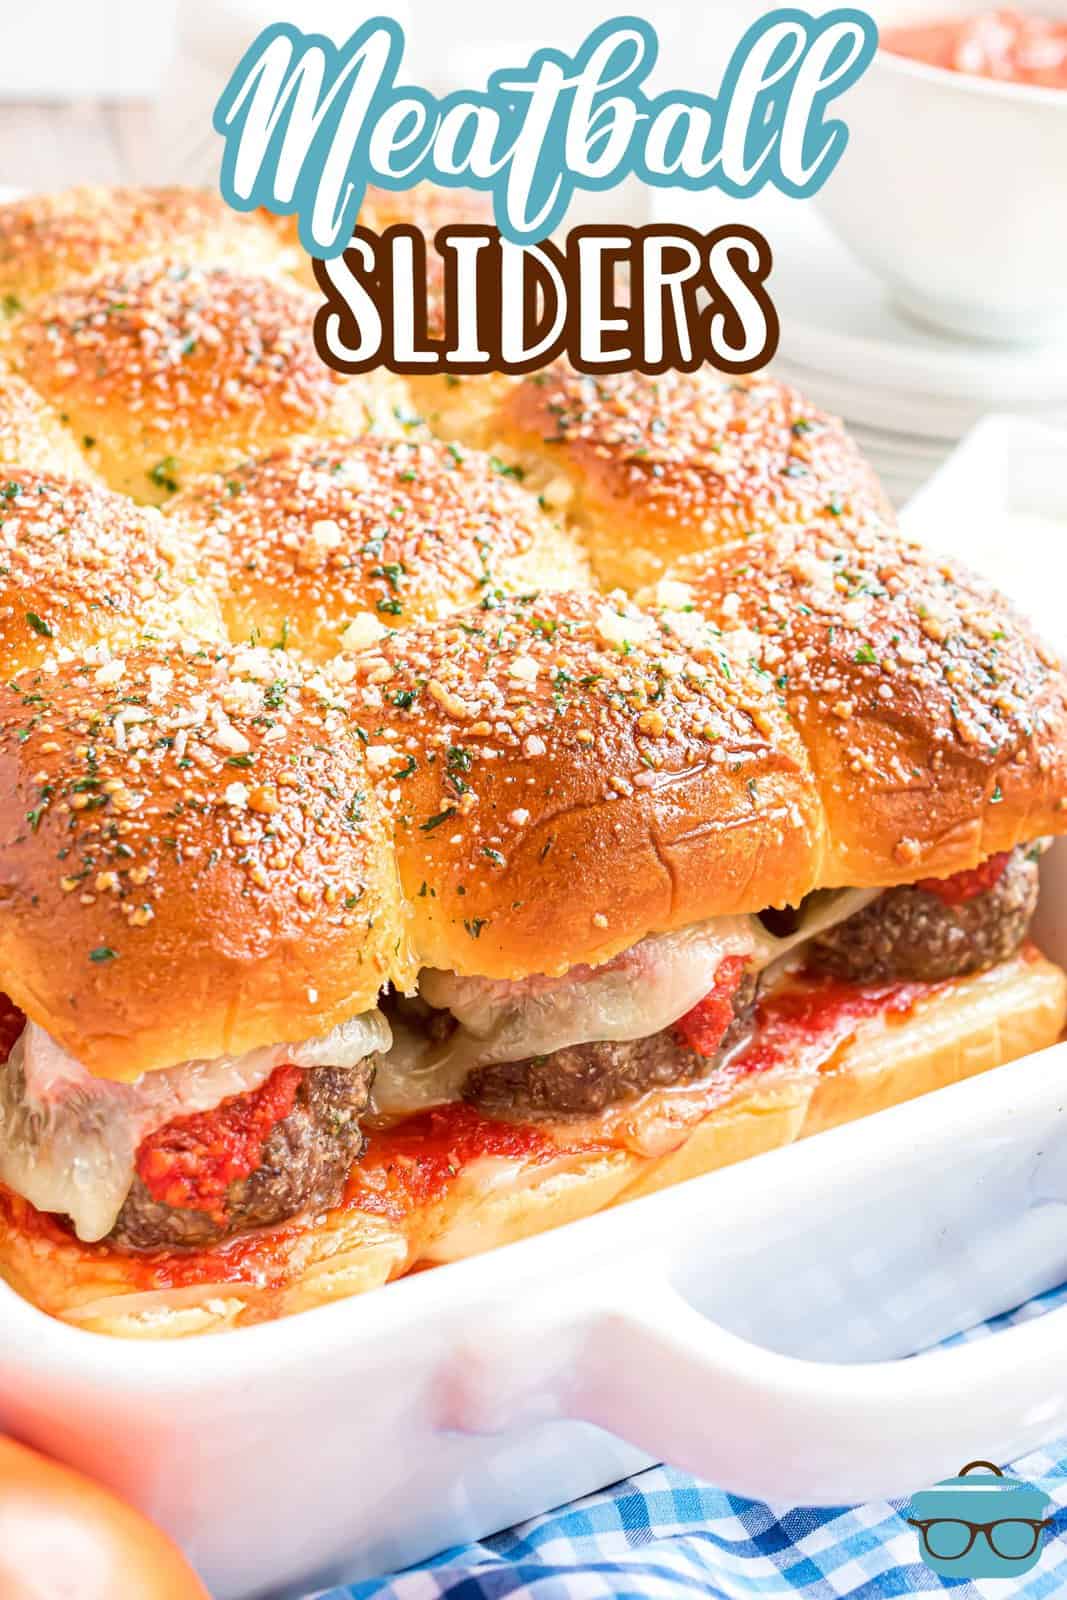
Meatball Sliders
Homemade Meatball Sliders are delicious and fun handheld sandwiches with a fantastic homemade sauce that will leave everyone wanting more!
THE BEST HOMEMADE MEATBALL SLIDERS
Look, if there is one recipe I need y’all to make today, it’s this one! These sliders are ridiculously good!! Seriously, everybody will be salivating when they see these being pulled out of the oven. The combination of juicy meatballs combined with a homemade sauce and a delicious glaze make these sliders irresistible. They’re perfect for any party or gathering – serve them for dinner, as an appetizer at your next backyard barbecue, or even as a snack. Just make them!
FREQUENTLY ASKED QUESTIONS:
If you’re strapped for time, try using a store-bought sauce instead of making it. I love Rao’s sauces (the roasted garlic flavor is a personal favorite). Alternatively, you can get the premade raw meatballs at the store. Then all you have to do is cook them up in the oven like I do below. I suppose you could use the frozen meatballs but you would need to thaw them and probably double up since they are pretty small.
However, when you do have the time, give this homemade a version a try, I promise it’s totally worth it!
You can make larger meatballs to go on those rolls. To do this, add a cube of mozzarella cheese or a ball of cheese to make thicker and bigger meatballs. I would make them a bit wider too so they cook evenly.
This is a little trick to make the meatballs come out moist and tender and not hard. I do this with hamburgers as well. A little splash of water mixed in makes a huge difference! But if you like a super firm meatball, just don’t add it.
Absolutely! These can be prepared a few hours in advance, covered and refrigerated until an hour before serving. Simply remove from the fridge, allow them to reach room temperature before baking, or add a few extra minutes to the baking time to thoroughly warm them up. As an added convenience, you can make both the sauce and meatballs ahead of time–even the day before. Simply pack them in an airtight container and store them in the refrigerator until you are ready to bake or assemble.
To store leftovers, cover them with foil or plastic wrap or store them in an airtight container. For best results, consume within 2-3 days.
After allowing the meatball sliders to cool completely, make sure to wrap them tightly with plastic wrap or aluminum foil. You can keep them frozen for up to three months by storing them in an airtight container or a zip-top freezer bag. To reheat, you can either thaw them in the fridge overnight or put them in the oven directly from frozen. Just preheat the oven to 350°F and bake the sliders for 10-15 minutes. Make sure they’re heated all the way through and the cheese is nice and melted.
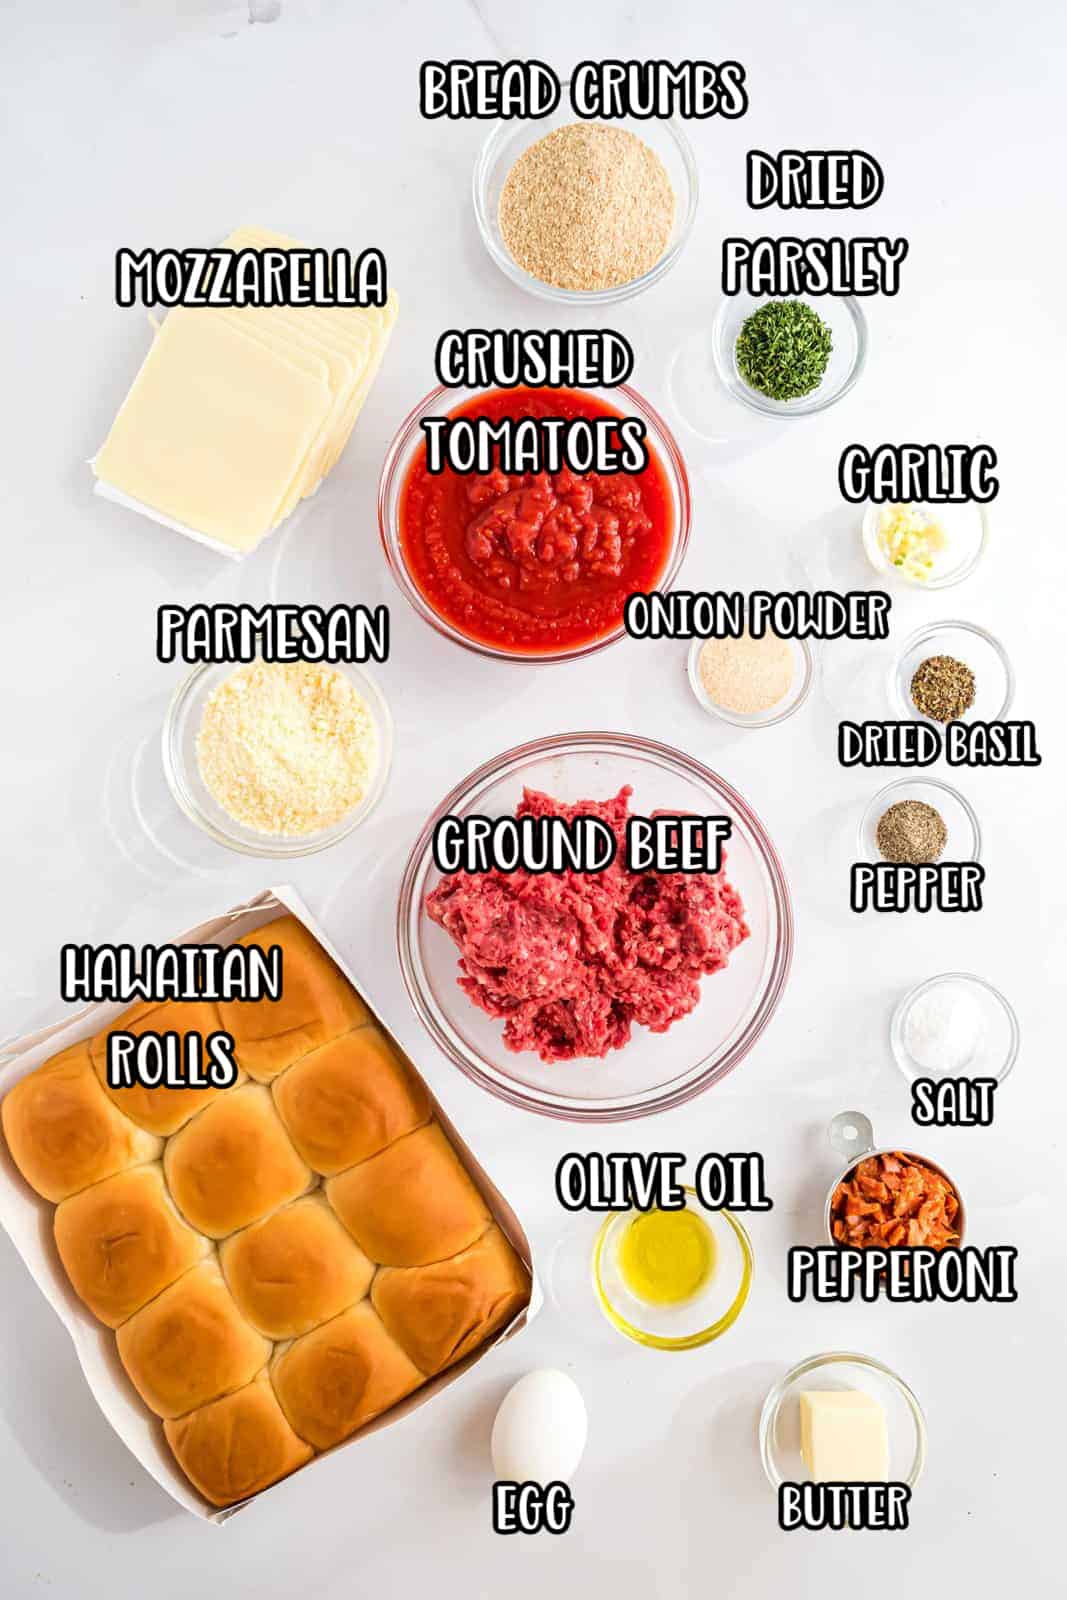
INGREDIENTS NEEDED: (SEE RECIPE CARD BELOW FOR THE FULL RECIPE)
- ground beef – I prefer to use a leaner ground beef so it produces less grease.
- finely minced garlic – I always go for fresh garlic when it comes to homemade meatballs but if all you have is the jarred stuff, then that is fine.
- dried parsley flakes – this is really just going to add a little color. If you don’t have any, don’t worry, just leave it out.
- breadcrumbs – you can use plain or the Italian seasoned. You could even use panko breadcrumbs.
- parmesan cheese – if you don’t like parmesan cheese, you can leave it out.
- finely chopped pepperoni – you want to cut them up pretty small, see my photos below.
- crushed tomatoes or tomato sauce – I prefer crushed tomatoes but if you can’t find that, go with tomato sauce. You can even purchase the crushed tomatoes that already has a bit of Italian seasoning in it.
- Hawaiian rolls or slider buns – Hawaiian rolls will add a slightly sweet flavor. If you don’t like that then just use dinner rolls.
- mozzarella or provolone cheese. – I prefer mozzarella but provolone works here as well.
HOW TO MAKE MEATBALL SLIDERS
Preheat oven to 350°F. Line a large baking sheet with aluminum foil or parchment paper and set aside.
For the meatballs:
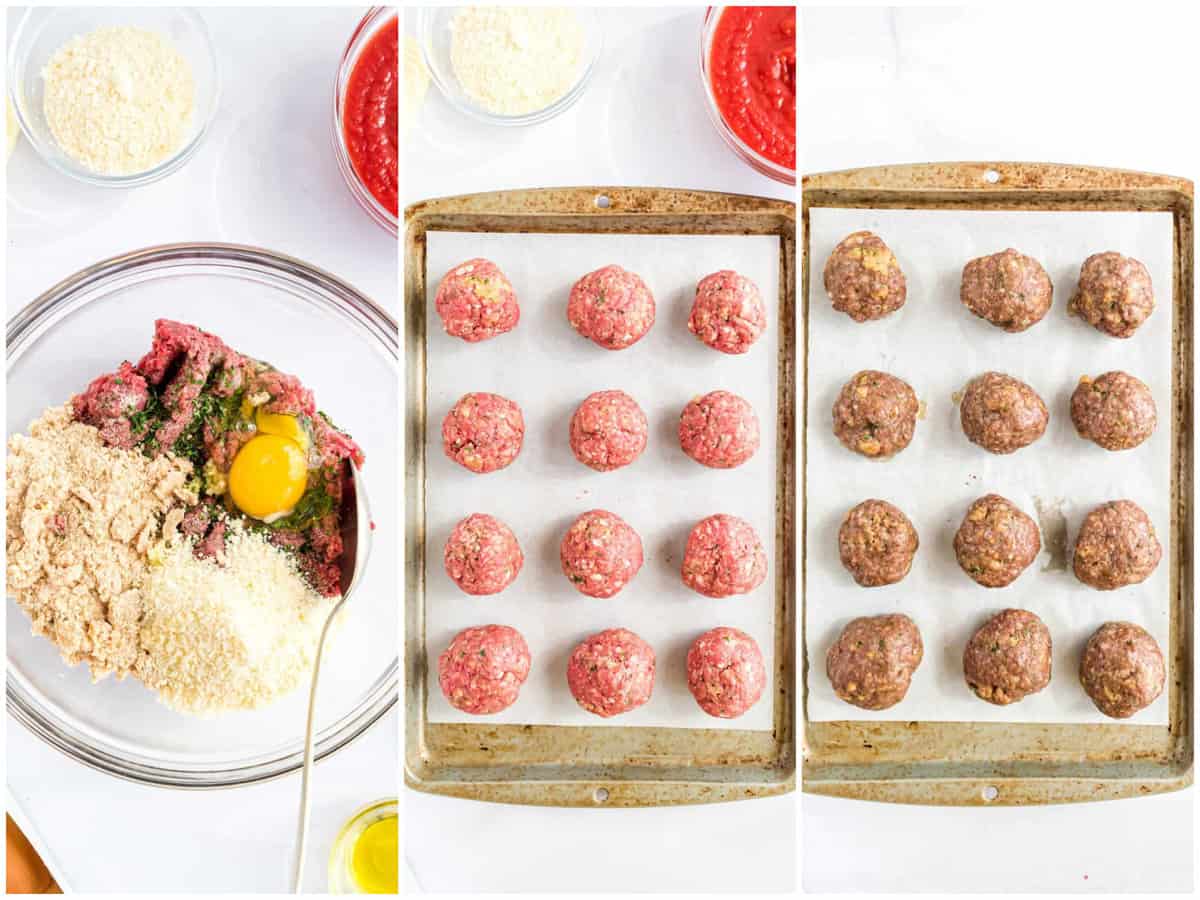
In a large bowl add the ground beef (breaking the meat up a little). To the meat add salt, pepper, onion powder, minced garlic, parsley, egg, Parmesan cheese, bread crumbs and water. Lightly mix until fully combined. I find this easiest to do with clean hands. Shape into 12 meatballs (about the size of a golf ball). Place meatballs onto the baking sheet (about an inch apart). Bake for approximately 15-20 minutes. Internal temperature should reach 160F degrees when done.
While the meatballs are baking, make the sauce
In a small saucepan, over medium heat, add the olive oil and chopped pepperoni. Cook for about 3 minutes or so. Then add in the garlic, and cook 1 minute more (or until fragrant). Next, add in the tomatoes, basil, salt, pepper, and Parmesan cheese. Simmer for about 10 minutes to blend flavors. Take off heat and set aside.

To assemble the sliders:
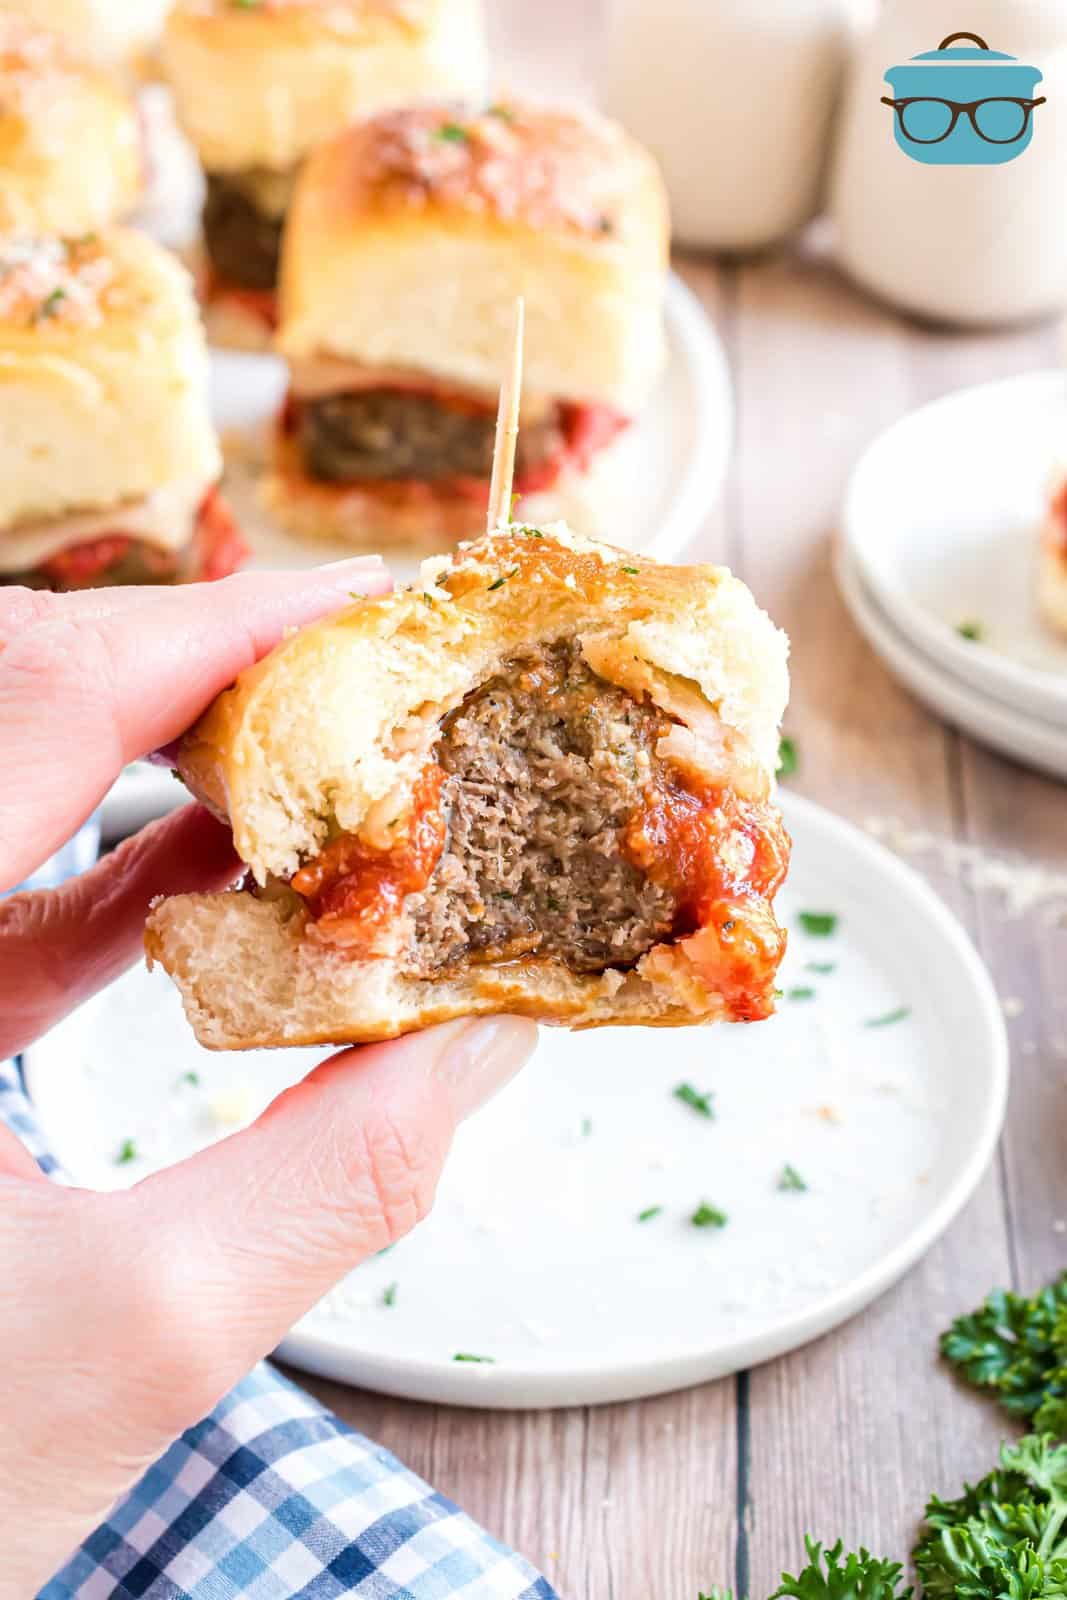
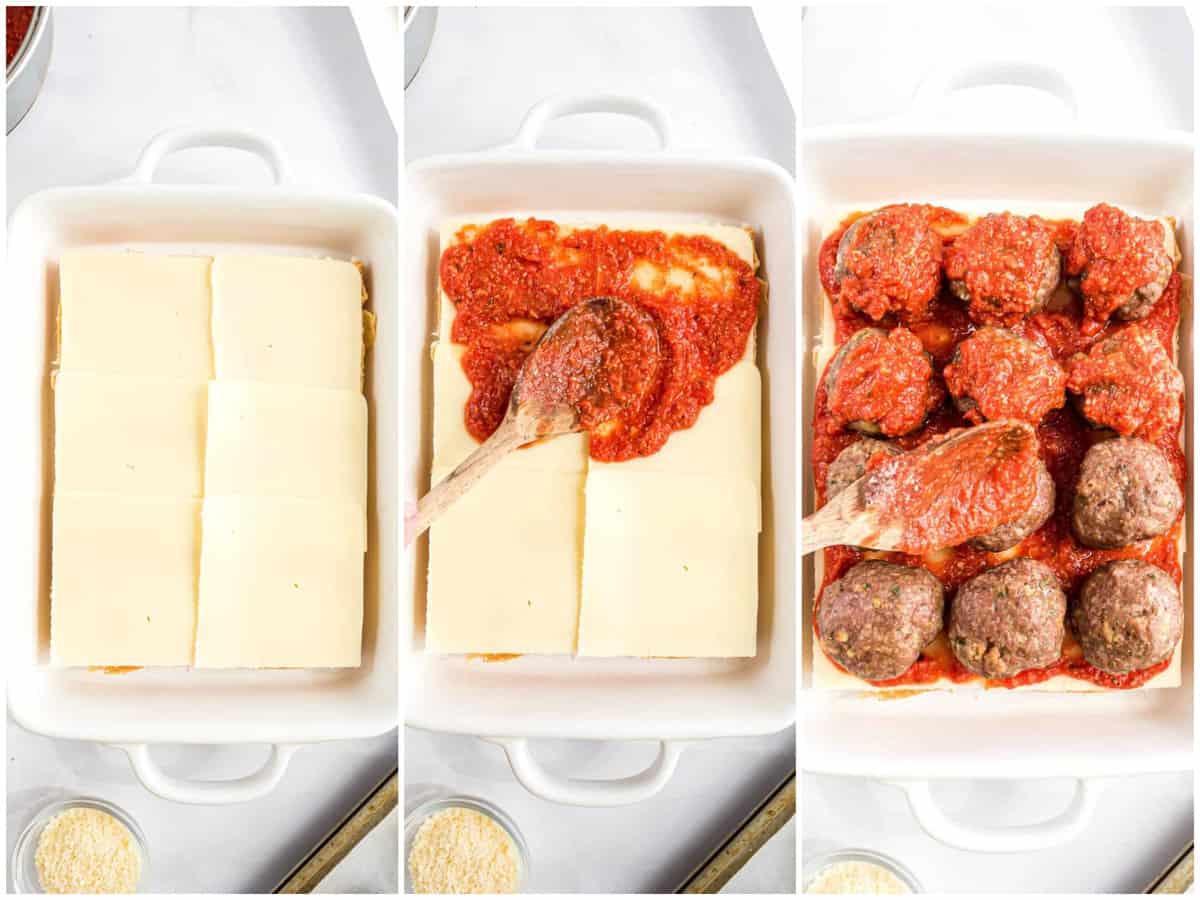
Remove the buns from the package, and without separating them, use a long, serrated knife to cut the rolls in half horizontally to create two halves (a top and a bottom.) Place the bottom half of the rolls in a 9×13-inch pan (you do not need to spray with nonstick spray) Layer 6 slices of mozzarella cheese evenly onto the bottom half of the bread. Spread about ½ cup of the sauce evenly over the cheese layer on the buns.
Place one meatball on each slider. Spoon another ½ cup of sauce on top, dividing evenly over the meatballs. You’ll reserve the remaining sauce for dipping. Note: you can add as much or as little as you prefer to the sliders.
Place the remaining 6 slices of cheese evenly over the meatballs. Top with the top half of buns. Brush the top of the sliders with melted butter then evenly sprinkle the top with grated Parmesan cheese and parsley or chives.
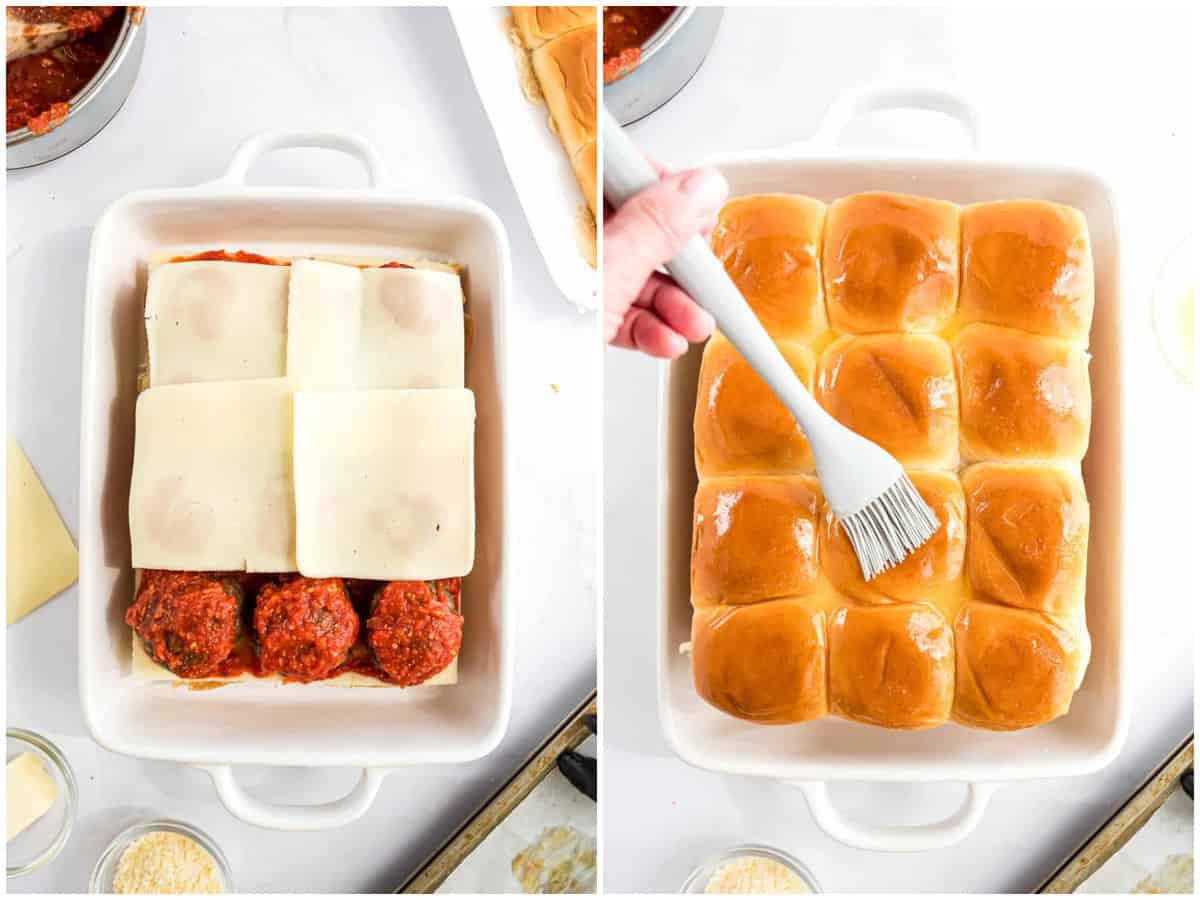
Bake uncovered for about 15 minutes or until the cheese is melted and the buns are golden brown. Note: if you find them getting more brown than you would like, just cover with aluminum foil until they are finished.

CRAVING MORE RECIPES?
- Ham and Cheese Sliders
- Pizza Pull-Apart Sliders
- Chili Cheese Dog Sliders
- Reuben Sliders
- Garlic Bread Italian Sliders
- Kentucky Hot Brown Sliders
- Monte Cristo Sliders
- Roast Beef Sliders
- BBQ Chicken Sliders
- Honey Mustard Ham Sliders
- Italian Grinder Sliders
- Big Mac Sliders
- French Dip Sliders
- Crock Pot Honey Garlic Meatballs
- Crock Pot Swedish Meatballs

Meatball Sliders
Ingredients
For the meatballs:
- 1 pound ground beef (I prefer a leaner ground beef so it produces less grease)
- 1 teaspoon kosher salt
- ½ teaspoon black pepper
- 2 teaspoons onion powder
- 1 clove finely minced garlic
- 1 Tablespoon dried Parsley flakes (optional)
- 2 Tablespoons water
- 1 large egg
- ½ cup breadcrumbs
- ½ cup parmesan cheese
For the sauce:
- 1 teaspoon olive oil
- ¼ cup finely chopped pepperoni
- 1 clove garlic minced
- 14 ounce can crushed tomatoes or tomato sauce
- ½ teaspoon dried basil
- ¼ teaspoon kosher salt
- ⅛ teaspoon black pepper (or red pepper flakes for more of a kick)
- ¼ cup parmesan cheese
To assemble:
- 12 pack Hawaiian rolls or slider buns
- 12 thin slices mozzarella or provolone cheese
- 2 Tablespoons unsalted butter, melted
- 1-2 Tablespoons grated parmesan cheese
- 1 Tablespoon chopped fresh parsley or chives to garnish
Instructions
- Preheat oven to 350°F. Line a large baking sheet with aluminum foil or parchment paper and set aside.
- For the meatballs:
- In a large bowl add the ground beef (breaking the meat up a little).
- To the meat add salt, pepper, onion powder, minced garlic, parsley, water, egg, Parmesan cheese, and bread crumbs.
- Lightly mix until fully combined. I find this easiest to do with clean hands.
- Shape into 12 meatballs (about the size of a golf ball).
- Place meatballs onto the baking sheet (about an inch apart). Bake for approximately 15-20 minutes. Internal temperature should reach 160F degrees when done.
- While the meatballs are baking, make the sauce
- For the sauce:
- In a small saucepan, over medium heat, add the olive oil and chopped pepperoni. Cook for about 3 minutes or so.
- Then add in the garlic, and cook 1 minute more (or until fragrant).
- Next, add in the tomatoes, basil, salt, pepper, and Parmesan cheese. Simmer for about 10 minutes to blend flavors. Take off heat and set aside.
- To assemble the sliders:
- Remove the buns from the package, and without separating them, use a long, serrated knife to cut the rolls in half horizontally to create two halves (a top and a bottom.)
- Place the bottom half of the rolls in a 9×13-inch pan (you do not need to spray with nonstick spray)
- Layer 6 slices of mozzarella cheese evenly onto the bottom half of the bread.
- Spread about ½ cup of the sauce evenly over the cheese layer on the buns.
- Place one meatball on each slider. Spoon another ½ cup of sauce on top, dividing evenly over the meatballs. You’ll reserve the remaining sauce for dipping. Note: you can add as much or as little as you prefer to the sliders.
- Place the remaining 6 slices of cheese evenly over the meatballs. Top with the top half of buns.
- Brush the top of the sliders with melted butter then evenly sprinkle the top with grated Parmesan cheese and parsley or chives.
- Bake uncovered for about 15 minutes or until the cheese is melted and the buns are golden brown. Note: if you find them getting more brown than you would like, just cover with aluminum foil until they are finished.
Notes
- Please refer to my FAQ’s and ingredient list above for other substitutions or for the answers to the most common questions.
- If you like a super firm meatball, just leave out the water.
- Use a meat thermometer to make sure you don’t overbake the meatballs (they should be about 160F degrees.
- We cook the pepperoni to help flavor the sauce.
- These can be made a few hours ahead of time and kept stored in the fridge.
- A small onion can be grated and used in place of the onion powder.
- Store leftovers wrapped or in an airtight container in the fridge for up to 2-3 days.
- You can freeze them if needed. Wrap with plastic and foil and keep in a freezer safe bag or container for up to 3 months.
Nutrition
Nutritional Disclaimer
“The Country Cook” is not a dietician or nutritionist, and any nutritional information shared is an estimate. If calorie count and other nutritional values are important to you, we recommend running the ingredients through whichever online nutritional calculator you prefer. Calories and other nutritional values can vary quite a bit depending on which brands were used.


Very delicious!
Took just the right amount of time to make – super quick, easy and delicious. No complaints.
Delicious! At first I thought the 1/2 C. parm would be too much, but it was just right. This will go into regular rotation – thanks!
So happy to hear that Amy! I really appreciate you taking the time to come back and comment!
It was delicious the children loved it!
I am so happy to hear that Melissa! Thanks so very much for taking the time to come back and comment!