French Dip Sliders
A fun twist on a classic sandwich, these French Dip Sliders are a deliciously easy appetizer or dinner idea for any day of the week! Roast beef, gooey cheese, au jus gravy – how can you go wrong?!
TRADITIONAL FRENCH DIPS MADE INTO FUN SLIDERS
I have always been a fan of French Dips. They are really one of my favorite sandwiches. When it comes to these French Dip Sliders, it takes that favorite sandwich to a whole other level. I love when I can have things in smaller portions that I can use as an appetizer or meal and not have to commit to one larger sandwich. With all the same great flavors of the classic, these are baked up with cheese, onions, roast beef and then a butter onion soup topping. Add in the au jus dipping sauce and this French Dip Slider recipe is a real winner!


Made these for the first time today for a pot luck contest at work (and won!) Everyone raved on and on about how good they were, too bad they were all eaten before I had a chance to try one. Just an excuse to make some more!
– Julie
FREQUENTLY ASKED QUESTIONS:
We usually use Hawaiian Sweet Rolls but you can use any of your favorite slider buns for this recipe. We like the contrast of the sweet rolls with the sandwich itself.
While this is the most common cheese used for French Dips you can use others such as mozzarella or even Swiss cheese.
These are great alone and don’t require the au jus. But they’re called French Dips because of the au just dipping sauce so we make the sauce.
While we want to stick with beef, you can swap out the deli roast beef with leftover pot roast, Mississippi roast, or any leftover beef you have on hand will work with this recipe.
No. If you feel like it is onion overload, just don’t use it. If you want, you can just melt a little butter and pour that on top. I also have a recipe for Homemade Onion Soup Mix as well.
These can be stored covered in an airtight container or in pan in the refrigerator where they will keep for 2-3 days. You can reheat in the oven until heated through or in the microwave.

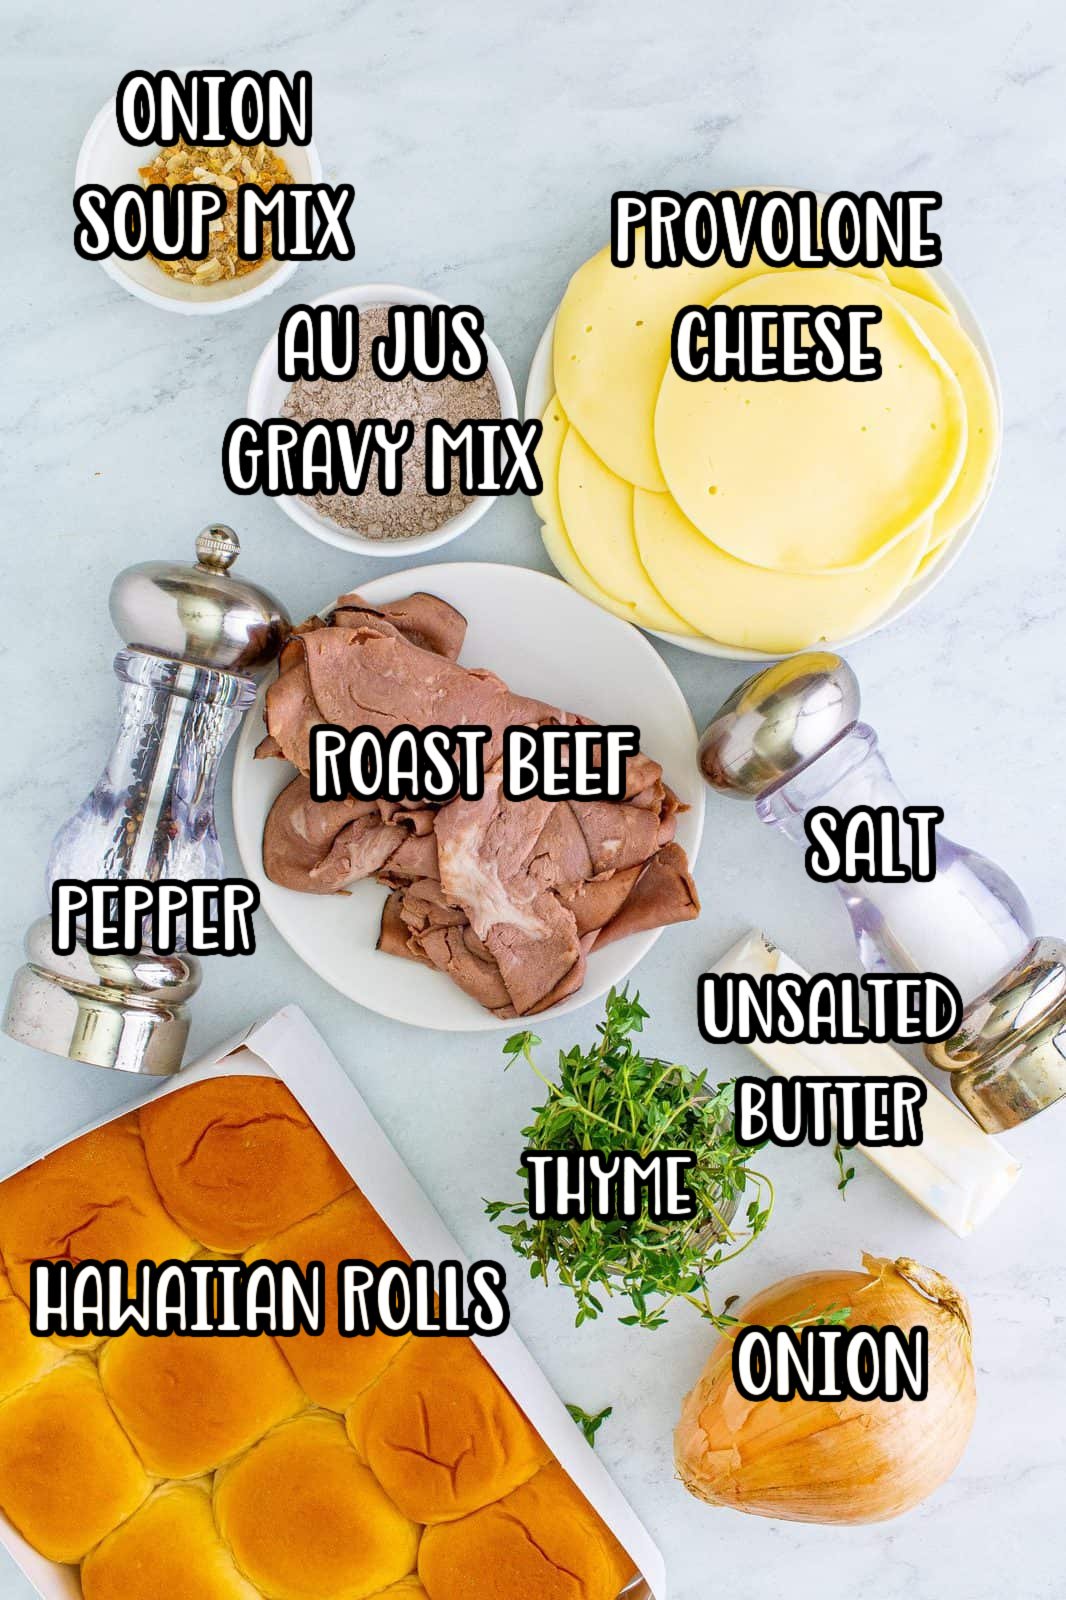
INGREDIENTS NEEDED: (SEE RECIPE CARD BELOW FOR THE FULL RECIPE)
HOW TO MAKE FRENCH DIP SLIDERS:
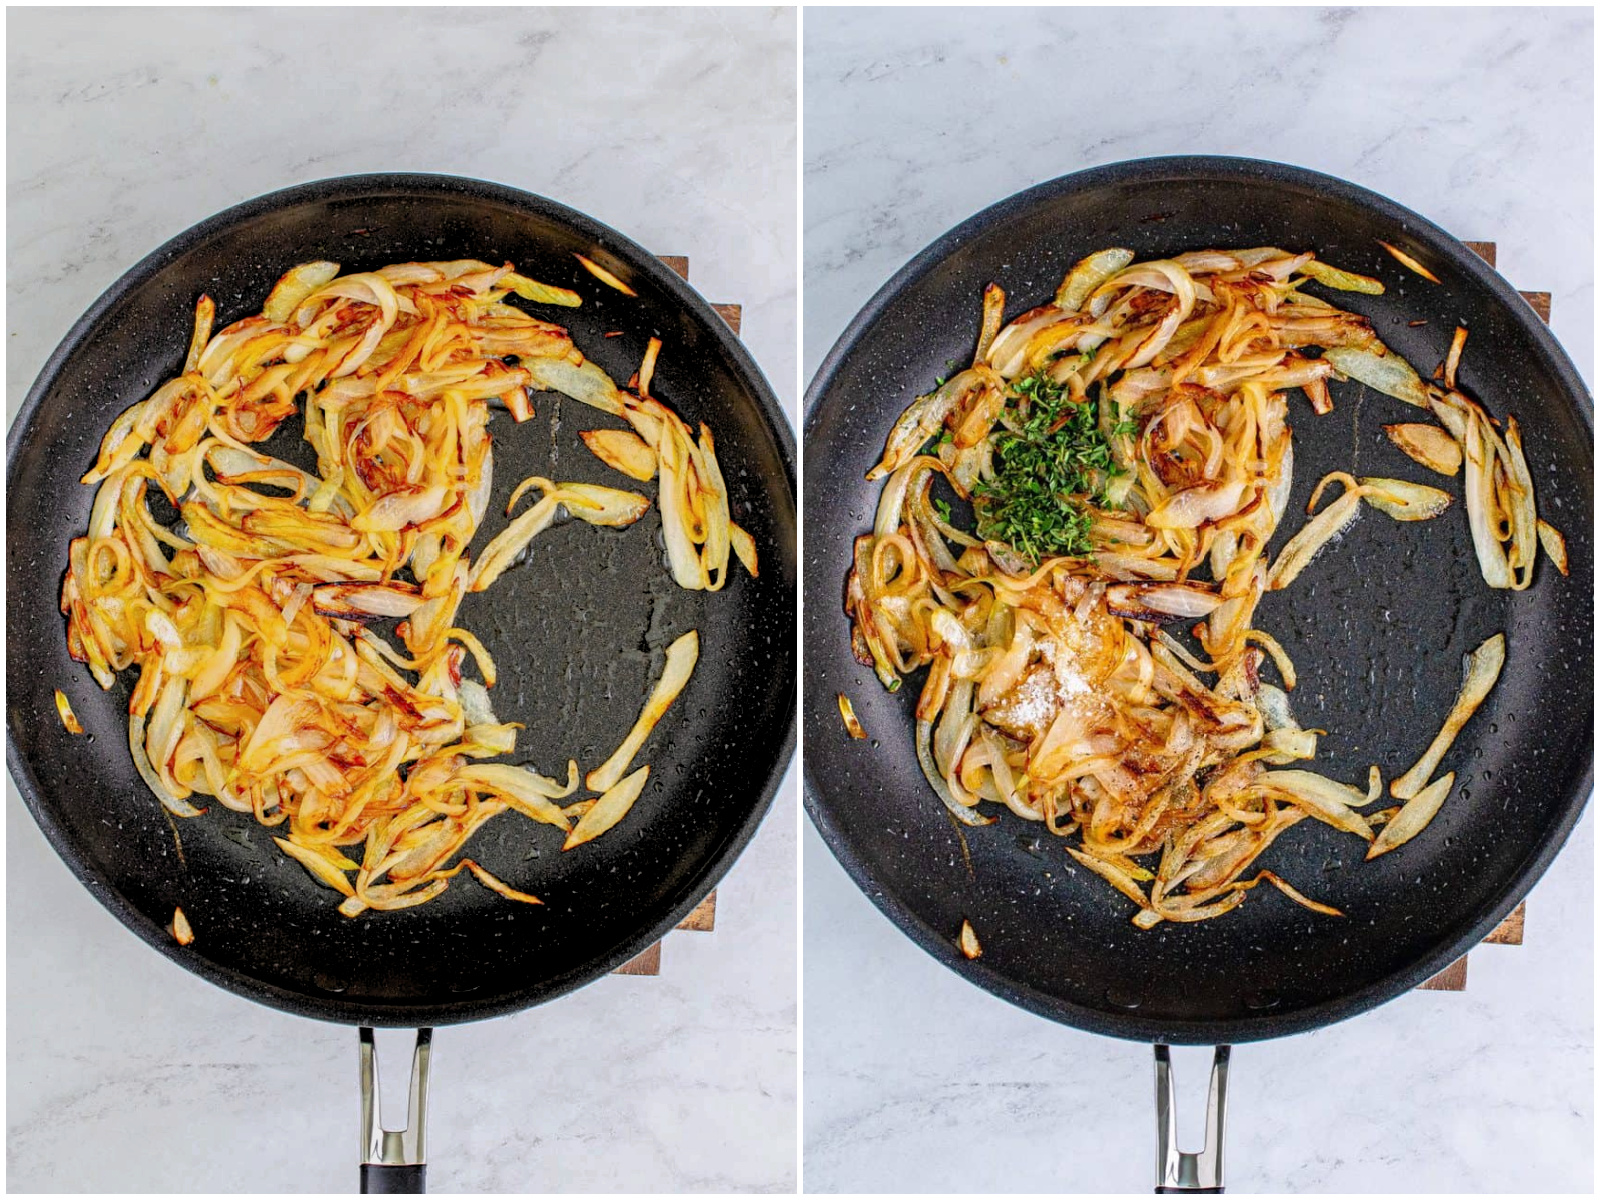
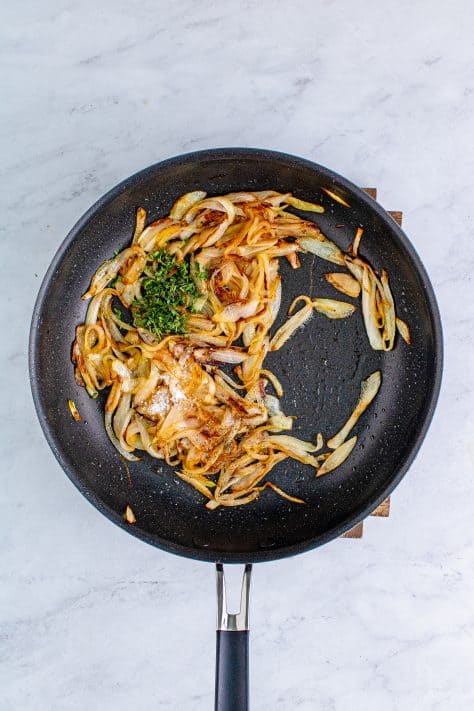
In a large skillet over medium heat, melt the butter. Add the onions and coat in the butter. Cook, stirring occasionally, for about 12-15 minutes until the onions are soft and browned but not burnt. Add the thyme, salt, and pepper, stir to combine, take off the heat, and set aside.
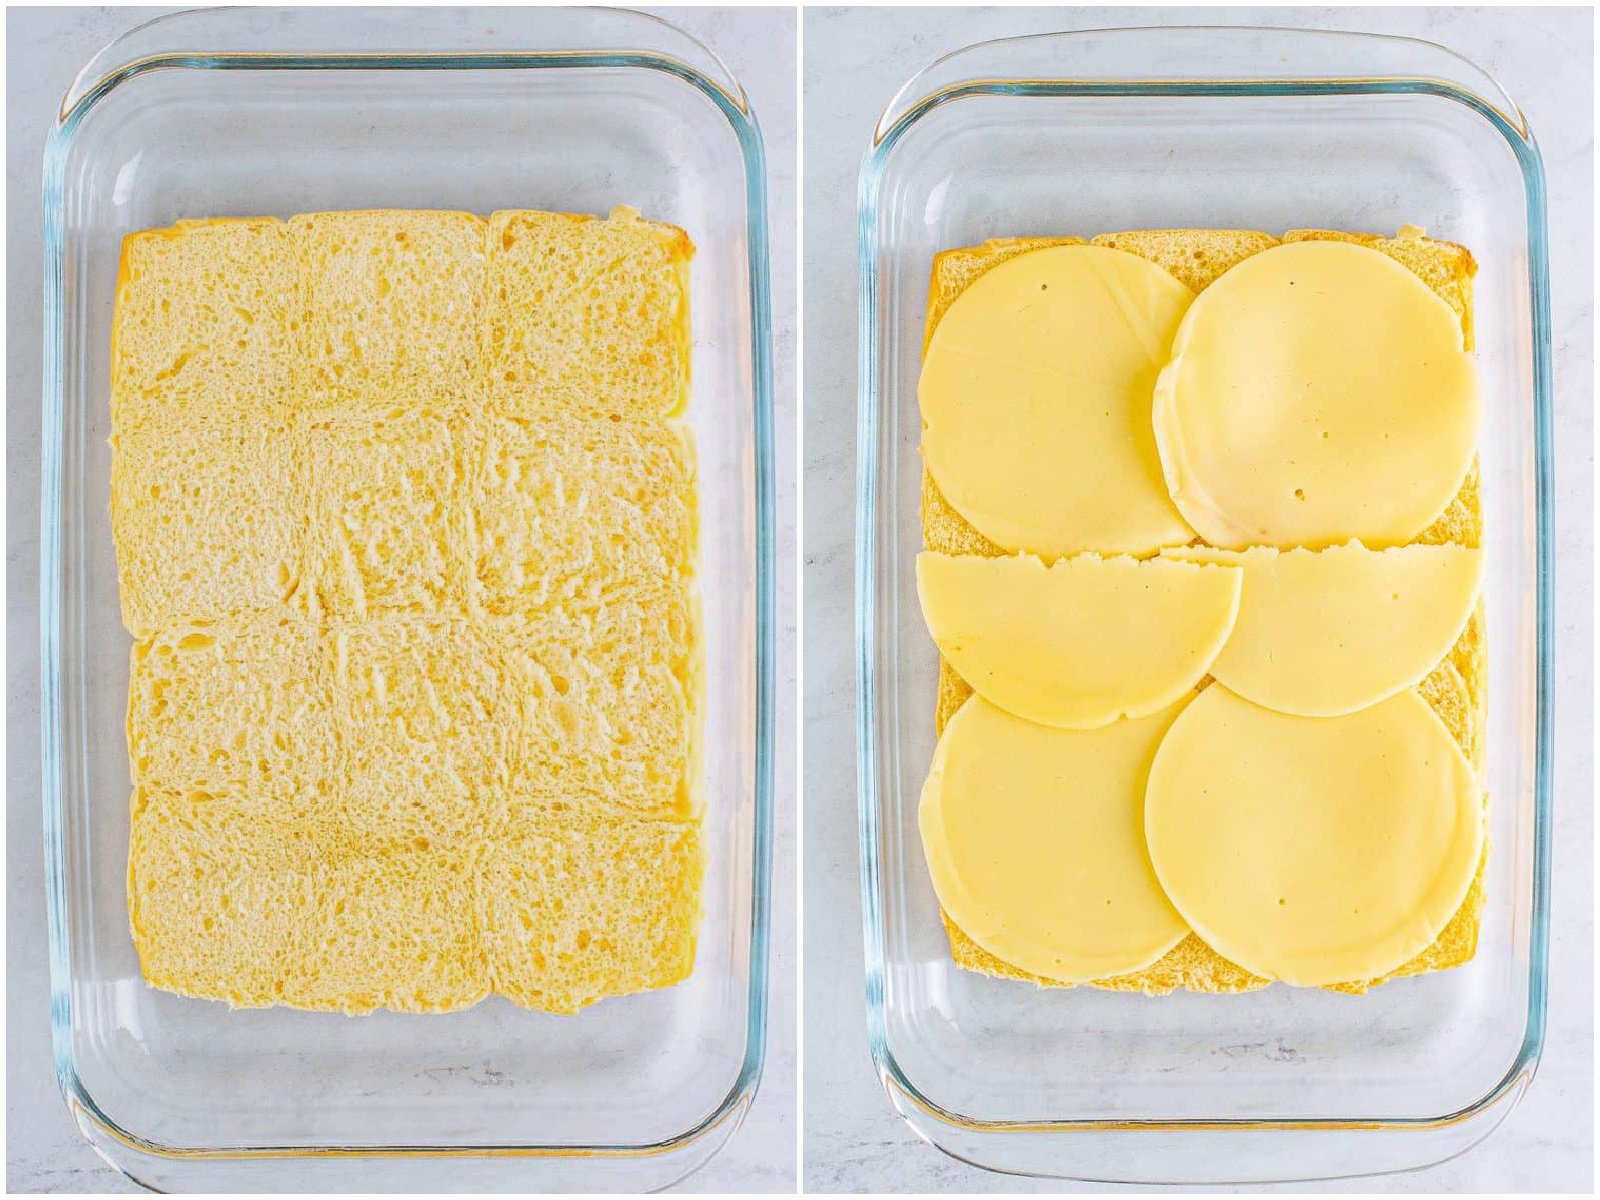
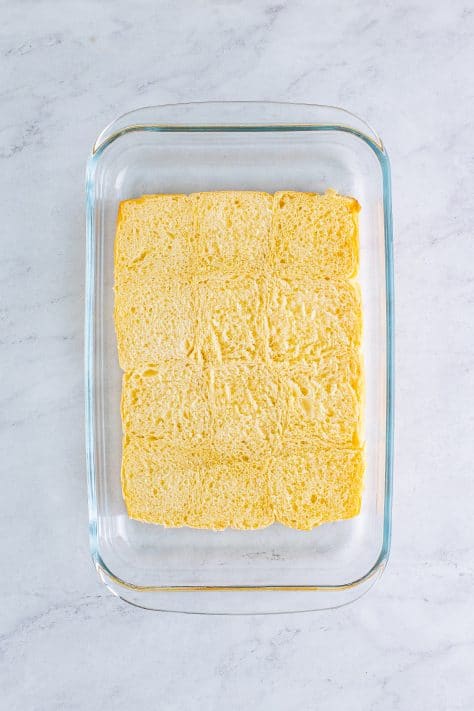
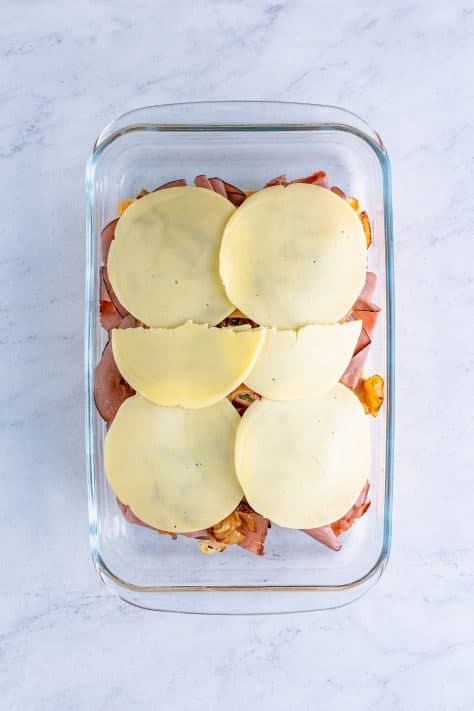
Preheat the oven to 350°F. Take the rolls out of the package, leaving the rolls intact. Take a large knife and slice the rolls across so you have the tops and bottom separated. Place the bottom, cut side up into an 11×7-inch baking dish. Top with half of the cheese.
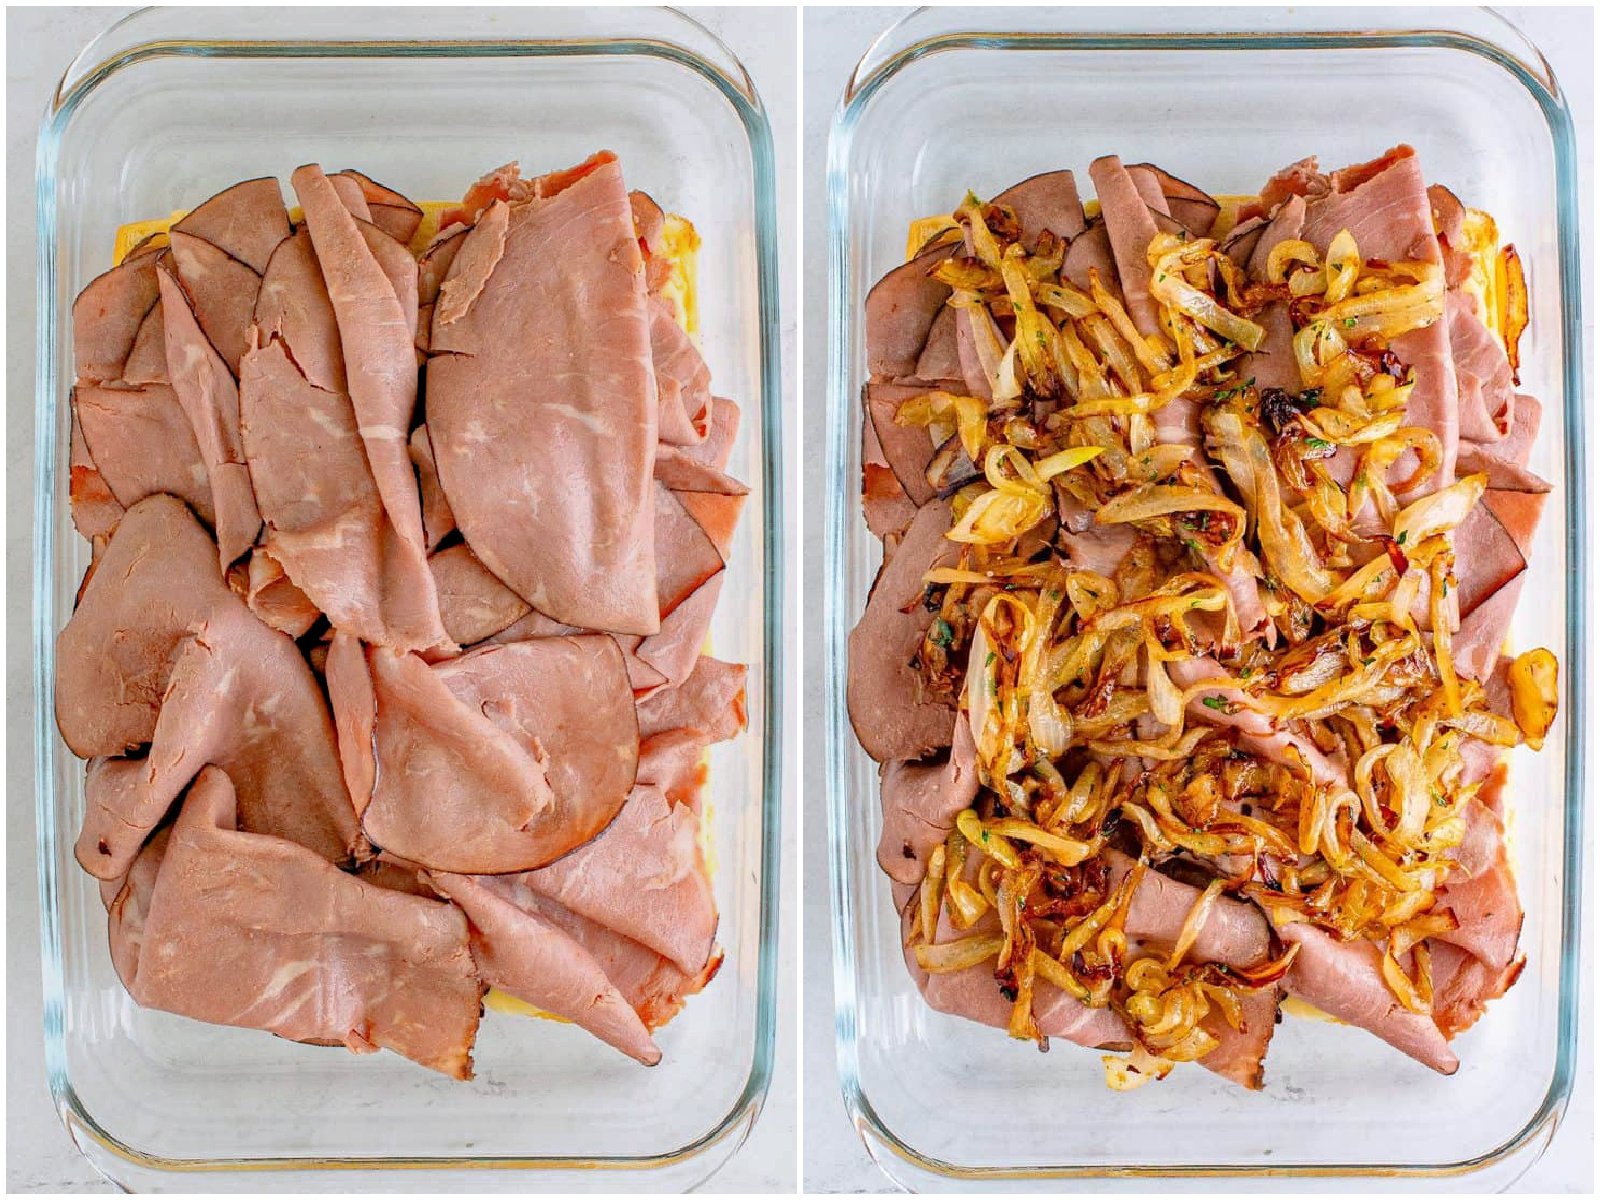
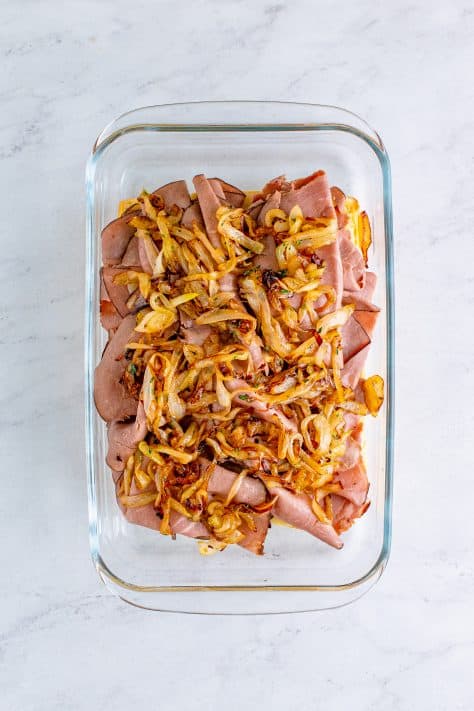
Add the roast beef. Top with the onions, spreading them out.
Add the remaining cheese. Then add the tops of the rolls on top.
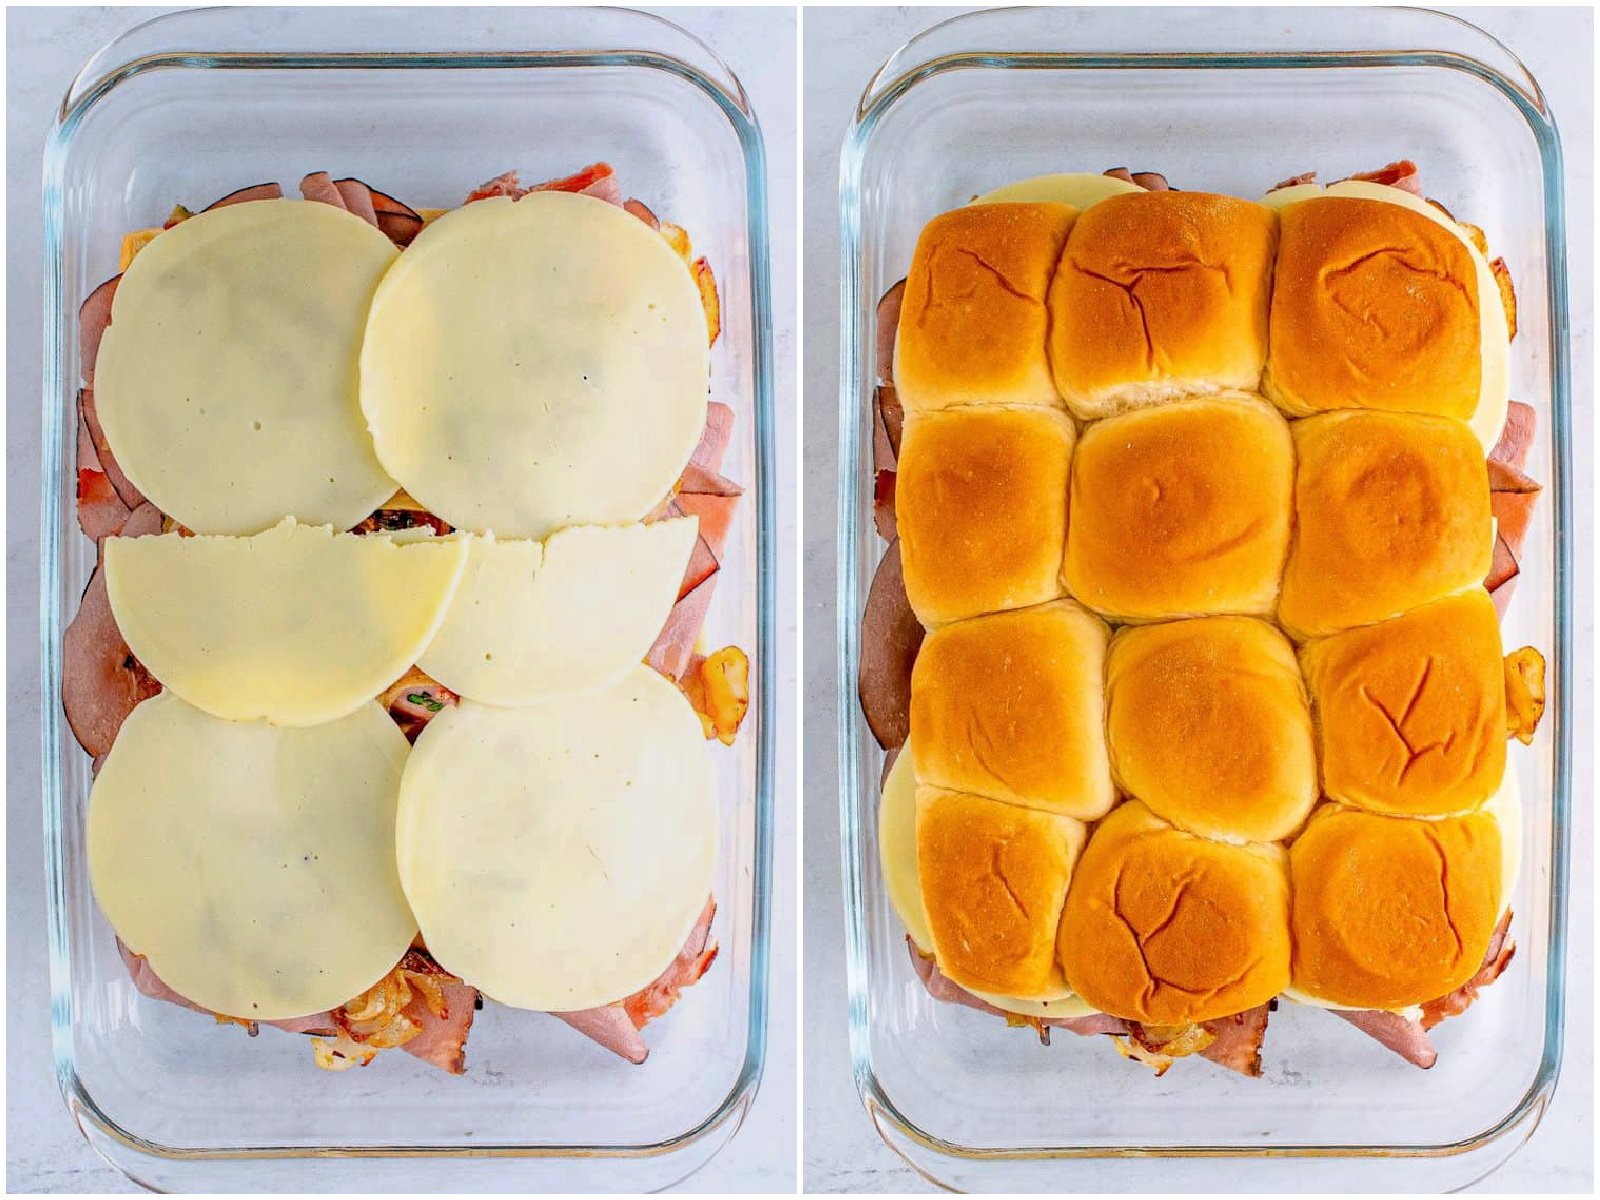
In a small bowl stir together the melted butter and onion soup mix. I like to brush this mixture on top of the rolls to make sure it’s evenly distributed but you can just pour the butter sauce on top. Cover loosely with foil, you want to make sure the foil is not touching the tops of the rolls and bake for 25 minutes. Take the foil off and bake an additional 5 minutes to brown the rolls.

While the rolls are baking, prepare the au jus per the package directions with the water.

Serve the rolls with an optional garnish of parsley and au jus on the side for dipping.

CRAVING MORE RECIPES?
- Pizza Pull-Apart Sliders
- Arby’s Beef and Cheddar Sliders
- Mississippi Pot Roast Sliders
- French Dip Sliders
- Texas Toast French Dips
- Garlic Bread Italian Sliders
- Honey Mustard Ham Sliders
- Chili Cheese Dog Sliders
- Sausage, Egg and Cheese Breakfast Sliders
- Kentucky Hot Brown Sliders
- Italian Grinder Sliders
- Chicken Bacon Ranch Sliders
- Leftover Thanksgiving Sliders
- Monte Cristo Sliders
- Big Mac Sliders
- Reuben Sliders
- Crock Pot Buffalo Chicken Sliders
- French Dip Egg Rolls
- French Dip Crescent Puffs
- French Dip Squares
- Roast Beef Sliders
- Arby’s Roast Beef and Cheddar
Originally published: February 2022
Updated photos & republished: March 2024

French Dip Sliders
Ingredients
- 12 Hawaiian sweet rolls (one package)
- 10 slices provolone cheese (divided use)
- 14 ounces sliced deli roast beef
- 3 Tablespoons unsalted butter
- 1 medium onion, thinly sliced
- 2 teaspoon fresh thyme, minced (optional)
- ¼ teaspoon kosher salt
- ¼ teaspoon black pepper
- ½ cup unsalted butter, melted
- 1 ½ Tablespoons dried onion soup mix
- 1 packet au jus gravy mix
- 3 cups water
- fresh chopped parsley for garnish (optional)
Instructions
- In a large skillet over medium heat, melt 3 Tablespoons unsalted butter. Add 1 medium onion, thinly sliced and coat in the butter. Cook, stirring occasionally, for about 12-15 minutes until the onions are soft and browned but not burnt.

- Add 2 teaspoon fresh thyme, minced, ¼ teaspoon kosher salt and ¼ teaspoon black pepper stir to combine, take off the heat.
- Preheat the oven to 350°F.
- Take the 12 Hawaiian sweet rolls out of the package, leaving the rolls intact. Take a large knife and slice the rolls across so you have the tops and bottom separated. Place the bottom, cut side up into an 11×7-inch (or 9×13-inch) baking dish.
- Top the bottom half of the rolls with HALF of the 10 slices provolone cheese and all 14 ounces sliced deli roast beef. Set aside.
- Top the roast beef layer with the cooked onions, spreading them out evenly.
- Add the remaining sliced provolone cheese, then place the top half of the rolls on top.
- In a small bowl stir together ½ cup unsalted butter, melted and 1 ½ Tablespoons dried onion soup mix. I like to brush this mixture on top of the rolls to make sure it’s evenly distributed but you can just pour the butter sauce on top.
- Cover the baking dish loosely with foil, you want to make sure the foil is not touching the tops of the rolls and bake for 25 minutes. Take the foil off and bake an additional 5 minutes to brown the rolls.

- While the rolls are baking, prepare the 1 packet au jus gravy mix per the package directions with the 3 cups water.
- Serve the rolls topped with a sprinkling of fresh chopped parsley (optional) with the prepared au jus on the side for dipping.


Video

Notes
- You can substitute the deli roast beef with an leftover pot roast.
- Use any of your favorite slider buns for this recipe.
- The au jus is optional but we really love dipping these in it.
- Provolone can be swapped for mozzarella or swiss cheeses if you’d like.
Nutrition
Nutritional Disclaimer
“The Country Cook” is not a dietician or nutritionist, and any nutritional information shared is an estimate. If calorie count and other nutritional values are important to you, we recommend running the ingredients through whichever online nutritional calculator you prefer. Calories and other nutritional values can vary quite a bit depending on which brands were used.


The taste is amazing!
Made these for the first time today for a pot luck contest at work (and won!) Everyone raved on and on about how good they were, too bad they were all eaten before I had a chance to try one. Just an excuse to make some more!
Ha!! I love it! And yes, you deserve some all to yourself!!
I wouldn’t change a thing about this recipe. My boyfriend and I loved these and we both agreed that they need to be on the regular dinner rotation!