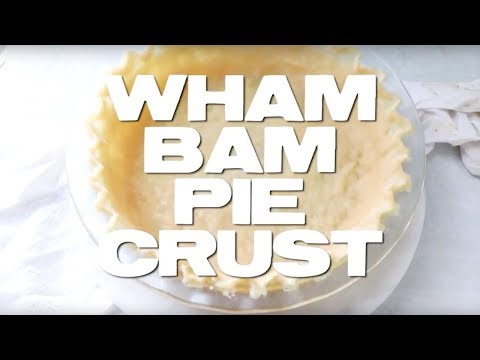
Wham Bam Pie Crust
Wham Bam Pie Crust is the easiest pie crust ever! No rolling pins, no cold butter and no fuss but you still get a tender and flaky pie crust!
Only 4 Ingredients
I like frozen pie crusts. Many of them are really good these days since many companies have really stepped up the quality of ingredients. But sometimes I want to use my own pie pans instead of the one that comes with the frozen crusts. And sometimes, that rustic look of a totally homemade pie just does something to me. I love the look of an imperfect, golden, flaky crust that has been crimped by my fingers
Nn Rolling Pin, No Cold Butter, No Tricks
But I need that crust to be easy to make. This crust is perfect for any one-crust pie. Like my Brown Sugar Pumpkin Pie, Southern Pecan Pie or Strawberry Pie. Or even for savory pies like Country Tomato Bacon Pie. It’s called Wham Bam because you don’t have to worry about cutting in cold butter or shortening like you do normal pie crusts or add in super cold ice water.
Tips For Making The Easiest Pie Crust
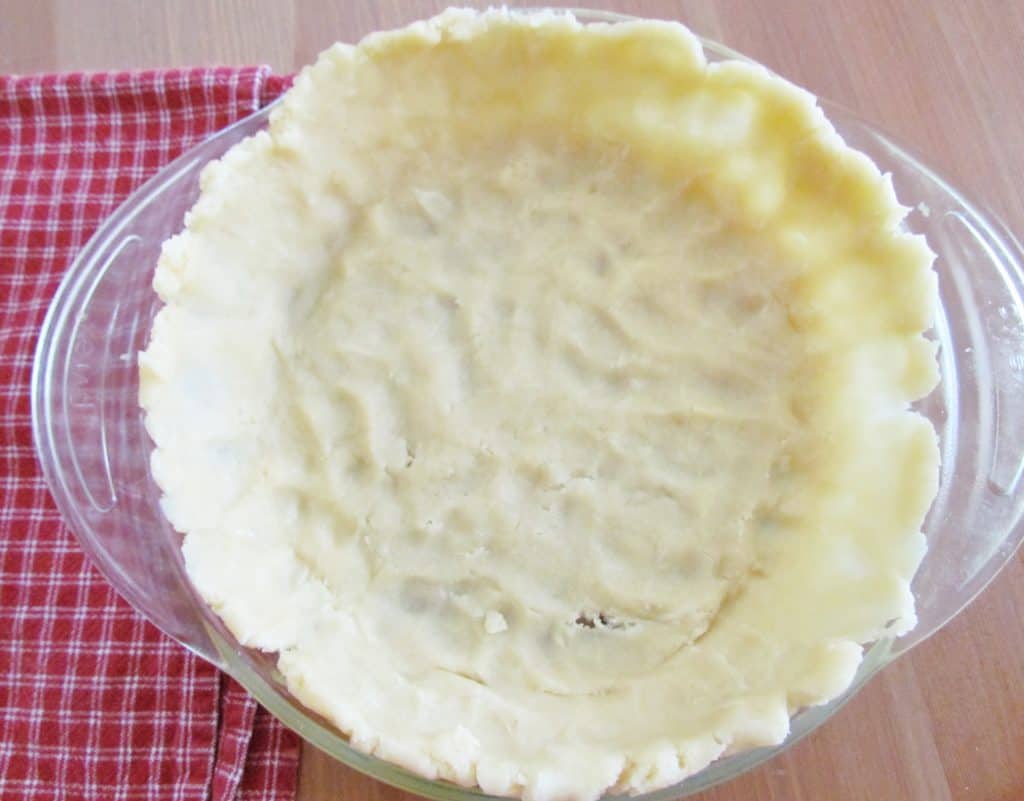
There is no rolling out of the dough (unless you really want to.) You stir it together and push it around with your fingers into the pie pan. It takes just a bit of time to spread it all around. But keep in mind, it’s the bottom part of your pie crust, it doesn’t have to be showcase beautiful. It’s very forgiving. But it’s also tender and flaky and bakes up to a beautiful golden color. Also, if you can find it, use White Lily brand flour. It is amazing in baked goods!

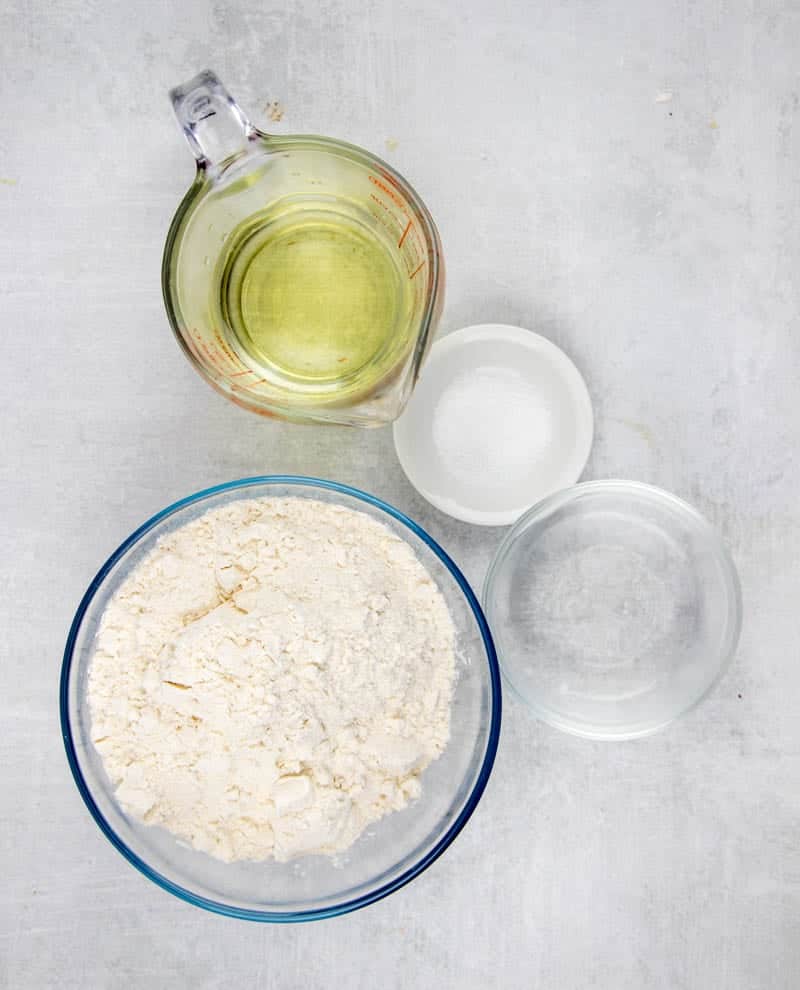
Ingredients Needed: (See Recipe Card Below For The Full Recipe)
- all-purpose flour – You cannot use self-rising flour for this recipe.
- salt – this gives it a bit of flavor without tasting salty and works well with sweet pies
- vegetable oil – it seems like a strange ingredient in pie crust, you’d expect butter or shortening right? But trust me, it absolutely works! I have not used other oils but you want to use an oil with a neutral flavor because you don’t want to taste the oil in the pie crust. You could probably also use melted and cooled butter.
How To Make Wham Bam Pie Crust
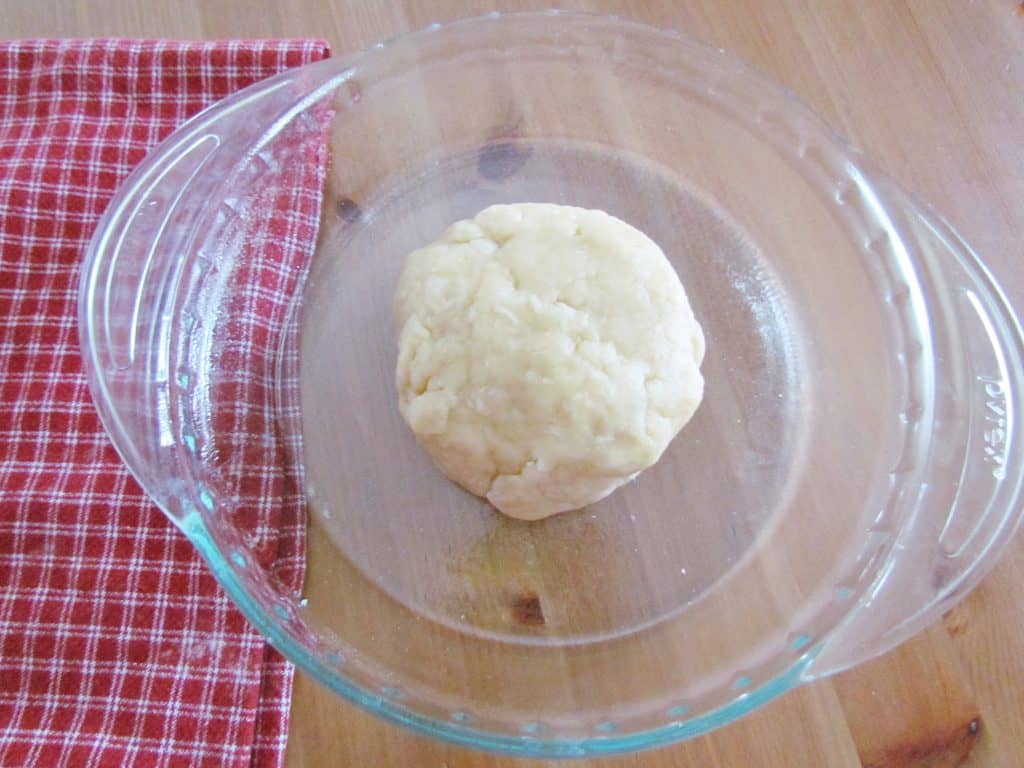
In a medium bowl, combine flour and salt. Stir in oil and water.
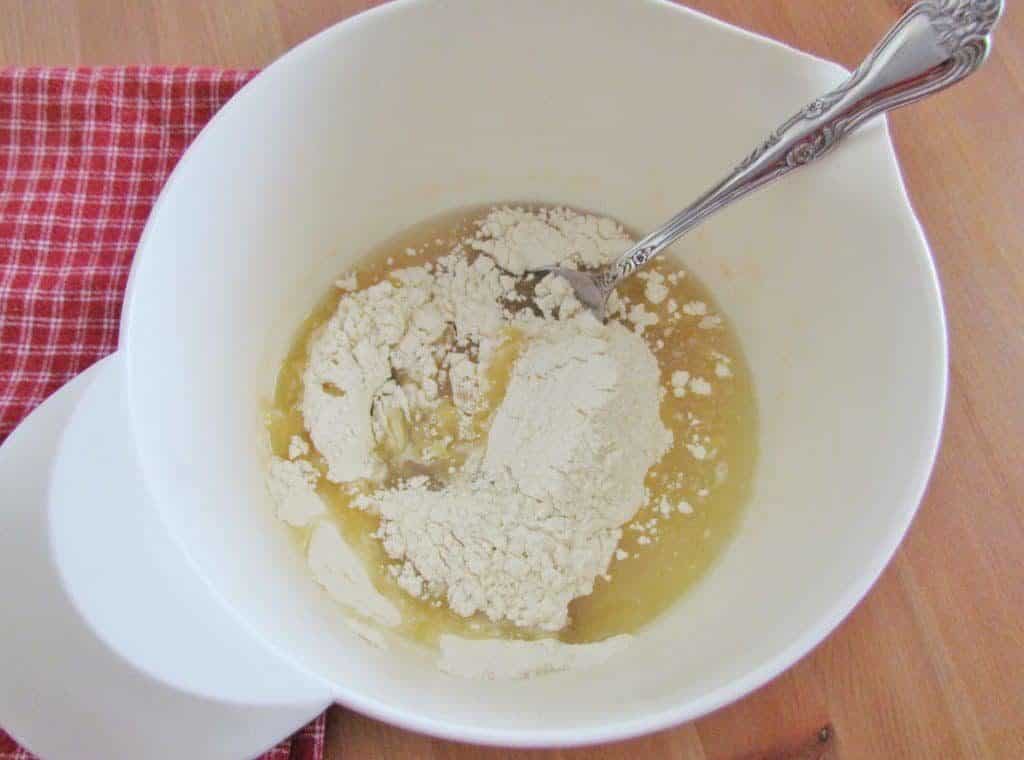
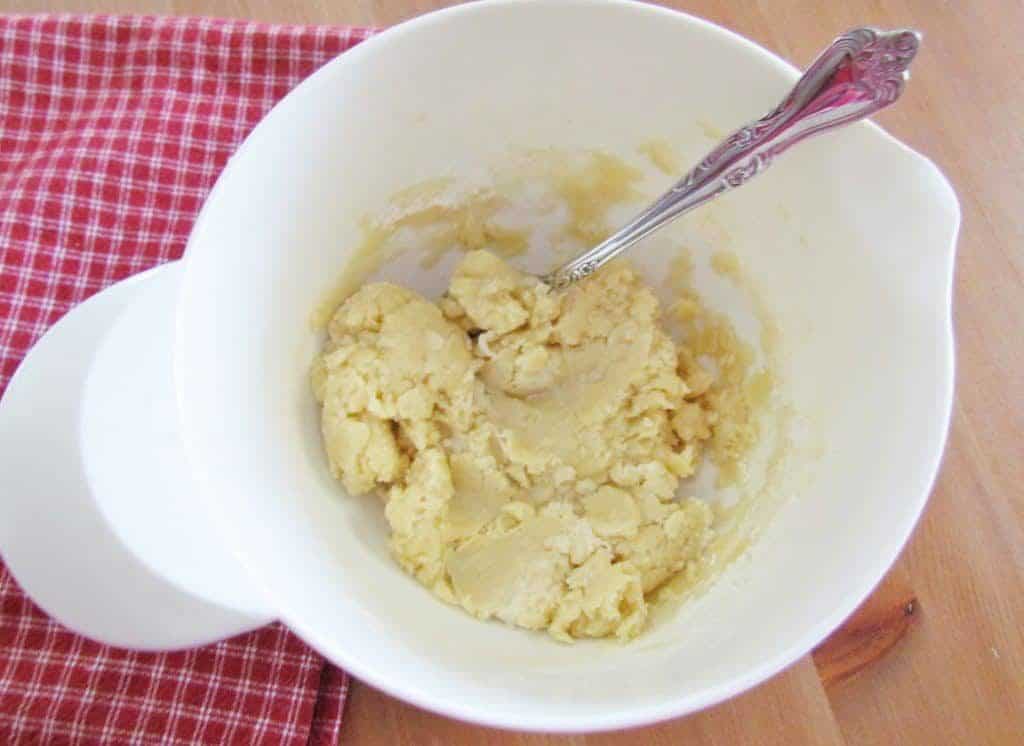
Mix until combined. Then form it into a ball.
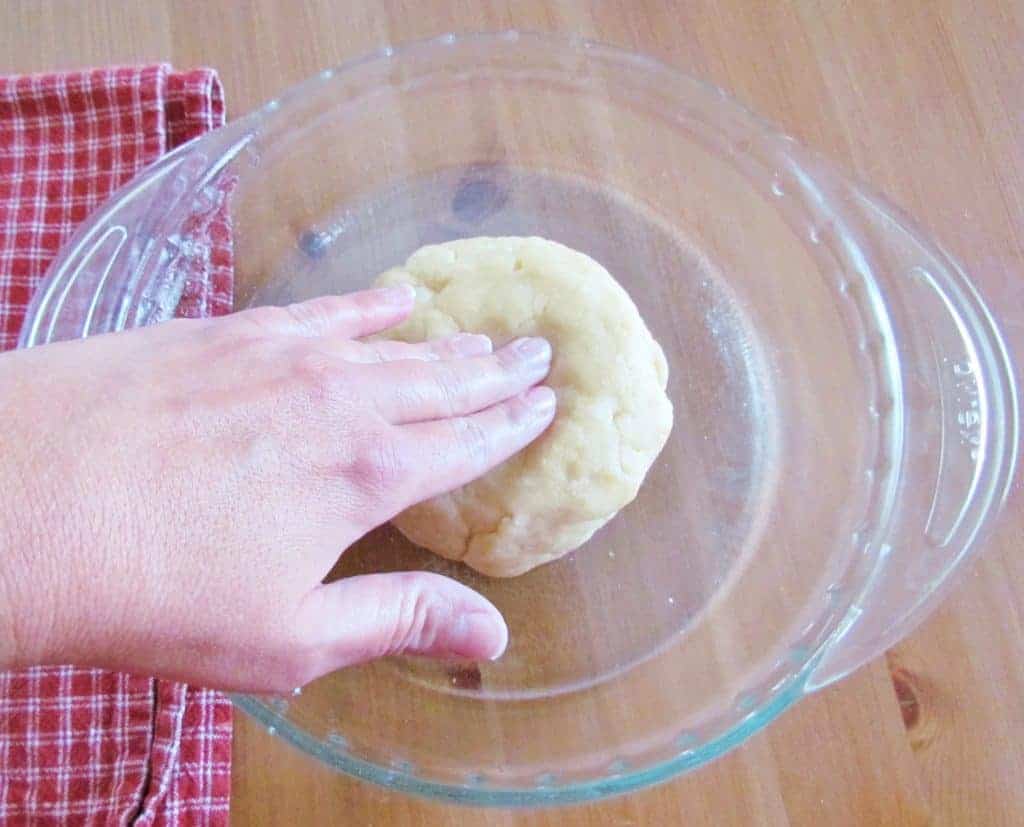
Spray your pie pan with nonstick cooking spray. It’s not really necessary but I just want to doubly make sure there is no sticking and it makes this dough just a bit easier to spread in the dish.
Now, start pushing down on your ball of dough and begin spreading it towards the sides.
Do as best as you can to evenly pull it up the sides. You’ll want plenty of dough up the sides too so you can crimp it at the top edge.
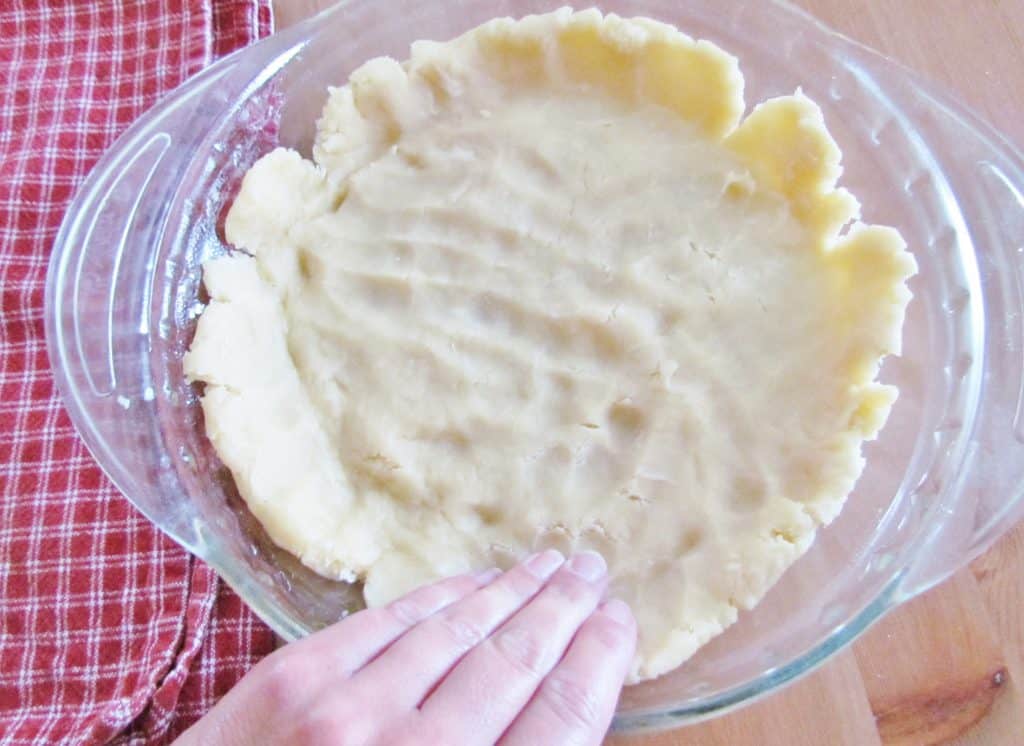
You can even get in there with your knuckles if you need to.
This is very forgiving dough. See that little tear there where I pulled the dough a little too hard?
Just smush around the dough with your thumb or fingers. It’ll seal right back up.
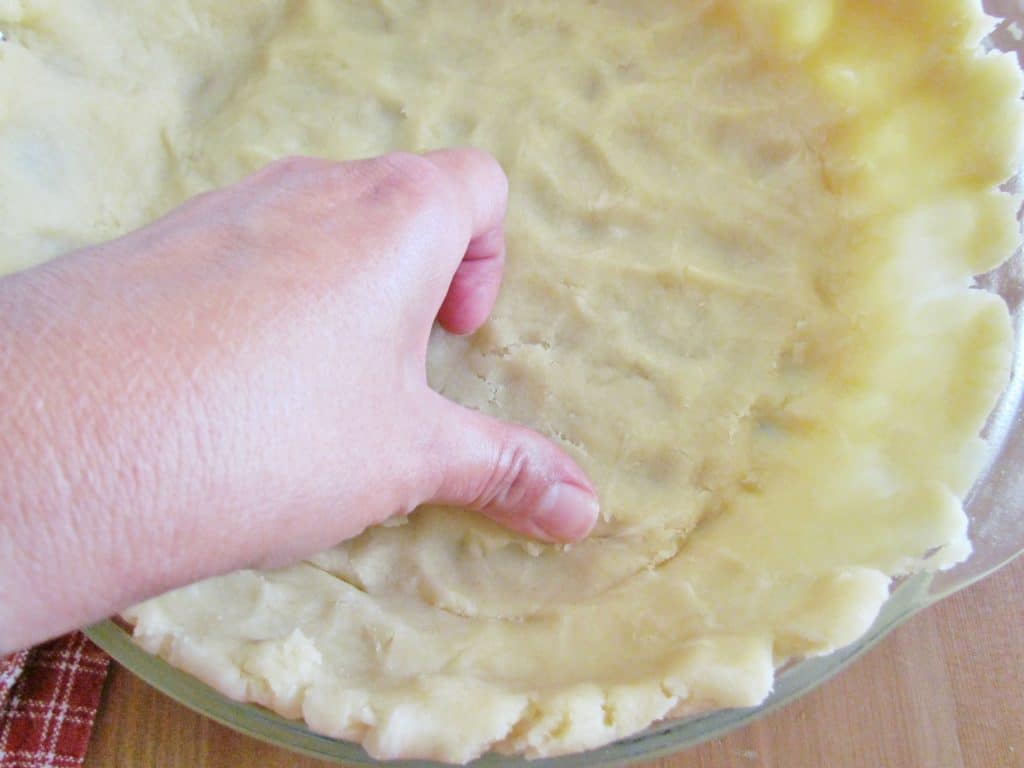
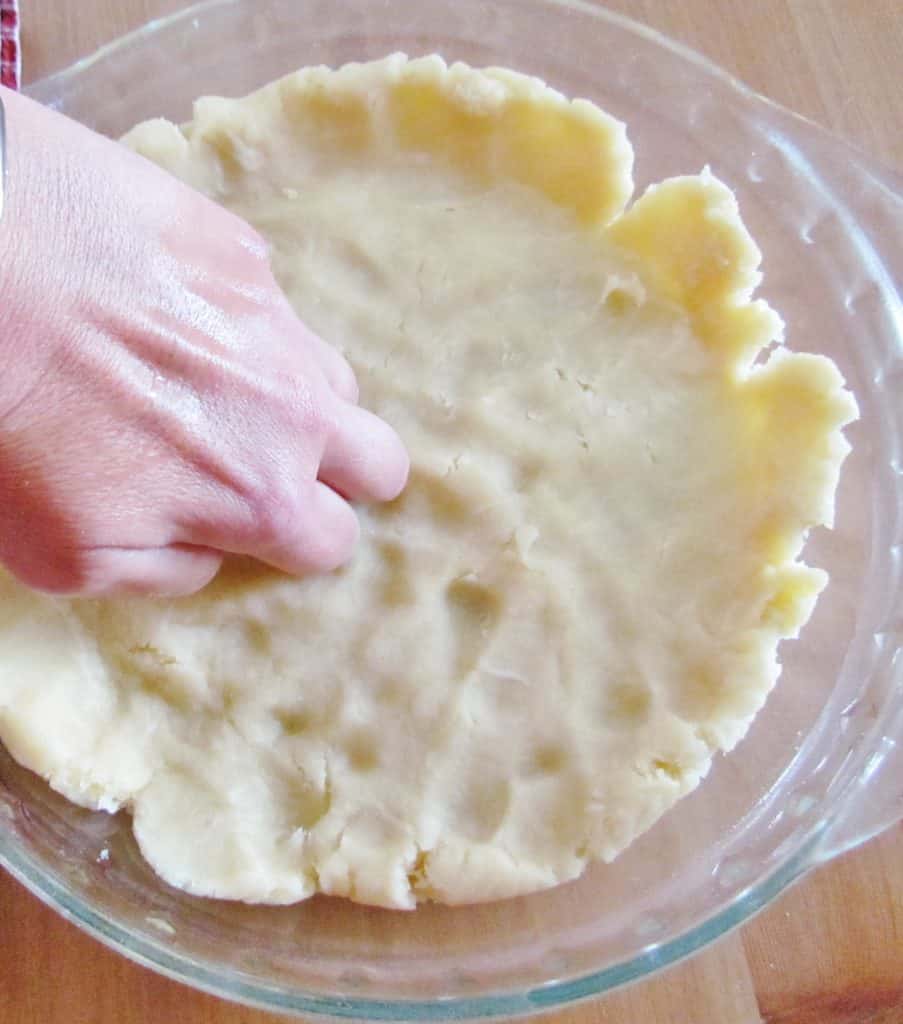
Make sure you also press down into the bottom rim of the pan too to spread out the dough and so it’s not too thick.
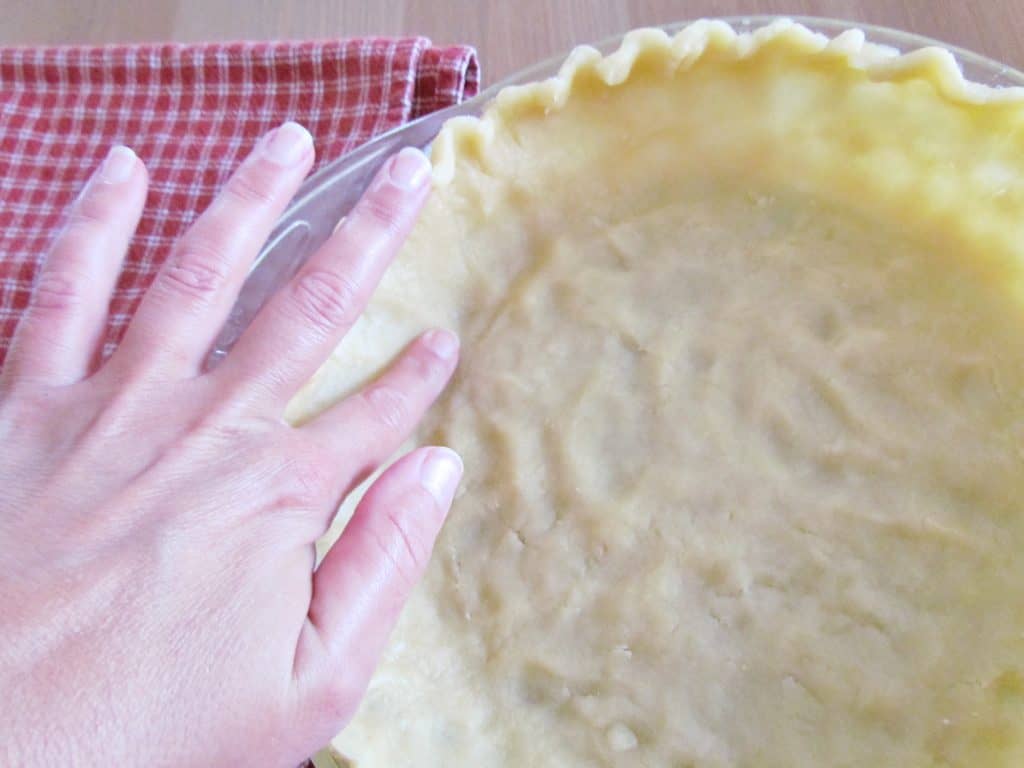
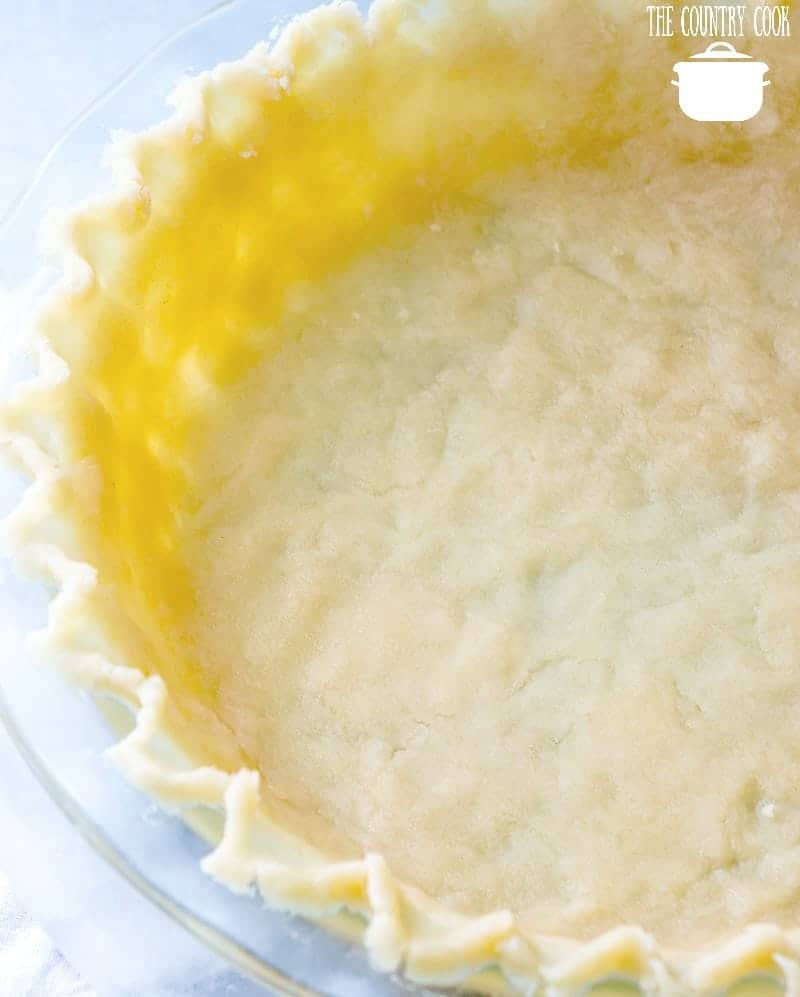
And then you can start to go around and crimp the top edges of the crust.

Now, this does not have to be perfect. I don’t know about you, but I like those little imperfections in baking.
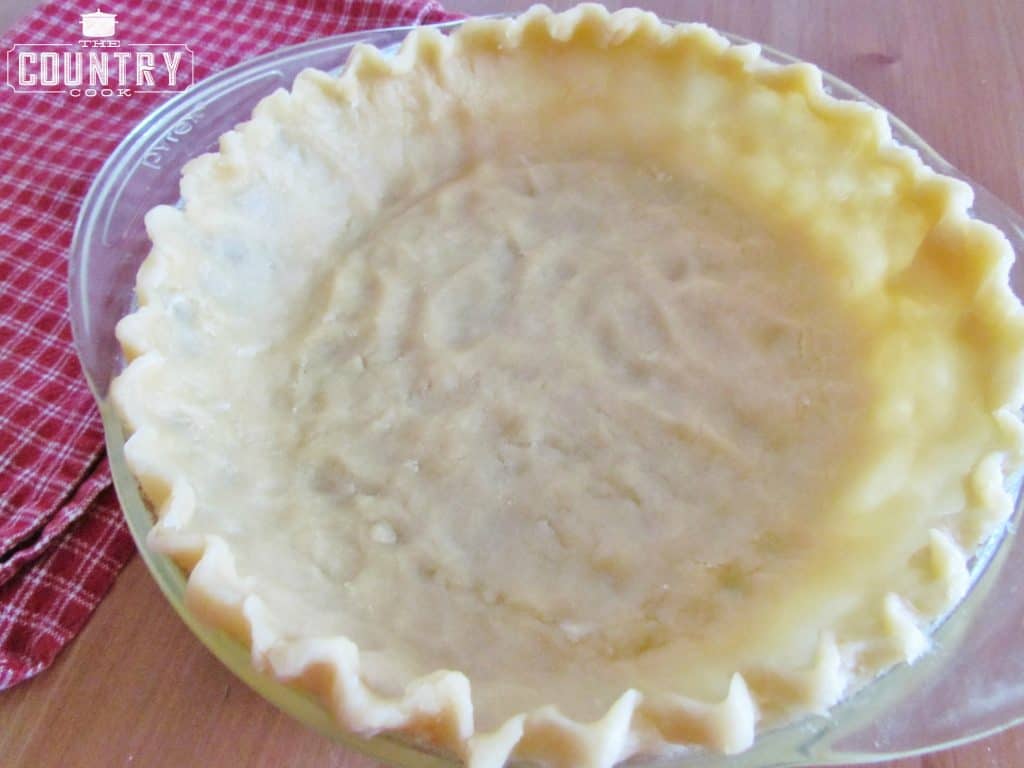
It lets folks know you made this all yourself. It’s rustic and it’s homemade. It should look that way. It bakes up beautifully golden and tender and flaky. It makes the perfect base for any of your one crust pies. And even the least-experienced of bakers can manage this easy and forgiving crust.
TO PAR-BAKE: Poke crust with a fork, all over the inside of the crust (so it doesn’t puff up too much while baking). Or if you have beans, you can line your crust on top with foil and then put beans inside to weigh it down to keep it from puffing up or prick it all over with a fork. Then bake at 400F degrees for about 10-15 minutes (maybe a tad longer). It should be golden in color.
Craving More Recipes?

Wham Bam Pie Crust
Ingredients
- 1 ¾ cups all-purpose flour
- ½ teaspoon salt
- ½ cup vegetable oil
- 2 Tablespoons water
Instructions
- In a medium bowl, combine 1 3/4 cups all-purpose flour and 1/2 teaspoon salt.
- Stir in 1/2 cup vegetable oil and 2 Tablespoons water. Mix until combined.
- Then form it into a ball. It will be thick.
- Spray a standard 9-inch pie pan with nonstick cooking spray. Put the ball of dough in the middle of your pie dish.
- Start pushing down on the dough ball and begin spreading it towards the sides. Do as best as you can to evenly pull it up the sides. This will take a few minutes
- You'll want plenty of dough up the sides too so you can crimp it at the top edge. You can even get in there with your knuckles if you need to.
- Make sure you also press down into the bottom rim of the pan too to spread out the dough and so it’s not too thick.
- Then you can start to go around and crimp the top edges of the crust.
- Once it’s ready, fill with your favorite filling and bake according to your pie recipe directions.
Video
Notes
- Poke crust with a fork, all over the inside of the crust (so it doesn’t puff up too much while baking). Or if you have beans, you can line your crust on top with foil and then put beans inside to weigh it down to keep it from puffing up or prick it all over with a fork. Then bake at 400F degrees for about 10-15 minutes (maybe a tad longer). It should be golden in color.
- Remember, this does not have to be perfect. It’s a bottom-only pie crust. It’s rustic and it’s homemade. It should look that way.
Nutrition
Nutritional Disclaimer
“The Country Cook” is not a dietician or nutritionist, and any nutritional information shared is an estimate. If calorie count and other nutritional values are important to you, we recommend running the ingredients through whichever online nutritional calculator you prefer. Calories and other nutritional values can vary quite a bit depending on which brands were used.
Originally published: September 2012
Updated & republished: October 2019


I have a gluten intolerance, has anyone tried this with a gluten free flour and if so, what kind and how did if turn out? I'd really appreciate any comments.
It is so good to see this recipe in 2014! The first time I saw it used was back in the 1950's when my Auntie used it. She filled it with a cream cheese and blueberry filling that was so delicious. Seeing your recipe brought back so many fond memories of her great pies that she shared with many many people in our little town. In fact, I think she used this recipe exclusively for her crusts. Thanks for bringing it to the front for me to see again as I had forgotten it. Now I can use it again, with good memories AND with consistently good results!
I used this recipe to make one of favorite pies a berries and cream from Betty Crocker cook book on Sunday. I had the last of it today and the crust was just as good it was on Sunday. I will be making crust again.
Just used this crust for a pumpkin pie and it came out great. Thanks! The last time I made pie, the crust was frustrating and turned out ugly (but edible).
Can this dough be made ahead and refrigerated? If so, for how long? Would like to make up dough today (25th) for Thanksgiving this Thursaday (28th).
is this for an 8 or 9 inch pie pan?
I use this recipe and I've found using the small end of a pizza/pastry roller works great for stretching the dough around in the pan. I roll it out right in the pan, then form it with my fingers.
GMSHenry53 wrote: I normally use a purchased prepared pie crust when making quiches and pies because I'm all thumbs when trying to make one the conventional way. So, I tried this the other day when making a quiche. It was so tender and flaky! I really was quite surprised at the taste of it as well. All total, I give this 5 stars or 5 thumbs up! Will use this from now on!!
I love to bake, especially pies, and I flatter myself that I do a good pie crust. But this is awesome for days when I want a pie but don't want to mess with rolling out a crust. Thanks!
My 11 year old loves to cook! She has been asking me to teach her how to make pie crust from scratch, which I haven't done in years. Your pie crust recipe is the answer. I cannt wait to give it a try!
I was given a similar recipe over 40 years ago. The only difference is that mine uses cold milk in place of the water, and a sweeter, if you are making a dessert pie. (Leave out the sweetener for a savory pie.) It's called "Mix-in-the-Pan Pie Crust". You don't even need a separate bowl to mix it in. By the time you're ready to press it out, the pie pan has already been coated with oil. And, if you don't roll it into a ball, and leave it spread out in the pan, it's quicker to fill the pie plate, since some of the dough is already around the sides of the pie plate. Even if all the ingredients are not completely mixed, pressing out the dough will fully combine all of them.
If you are into a healthier crust, you can also use a combination of whole grain flour with AP.
For an 8 1/2 or 9 inch pie plate:
1 1/2 cups flour (you can use half all-purpose with half whole grain)
2 teaspoons granulated sugar, confectioners sugar, or honey (if using honey add with the wet ingredients)
½ t. salt
1/2 cup oil or soft butter (I have always used all oil)
2 – 3 tablespoons cold milk (start with 2 and add more if too dry)
For a 10″ pie plate:
2 cups flour
2 1/2 teaspoons sweetener
2/3 teaspoon salt
2/3 cup oil
3+ tablespoons cold milk
Directions
In a pie plate, place the flour, sweetener, and salt and combine well with a fork. Add the fat and milk, and continue to combine. When all the ingredients are fully combined, start pressing it out to fill the bottom and sides of the pie plate. Flute the edges as you would normally do.
For a blind-baked crust, prick well with a fork and bake at 400 degrees for 12 – 15 minutes. Check it as it bakes, pop any bubbles that form with the tines of a fork, and press flat with the fork. Keep an eye that it doesn’t get too brown. Let cool and fill with a cool filling.
For a single crust filled pie, fill the crust and bake per the recipe instructions.
For a double crust pie, double this recipe and roll out each crust between 2 layers of saran wrap (with no flour). Remove the top layer of plastic wrap, and flip the crust into the pie plate. Carefully press into the plate, using the saran wrap to help you move the crust to where you want it, and then remove the saran wrap. Repeat for the top crust, seal, and flute. Bake as per your recipe time and temperature. This makes a very thin crust, which saves a lot of calories.
I also make 1 1/2 times this recipe for a crust base in a 9 X 13 pan, such as the Peach Kuchen I make often, when I'm catering. I can gather the crust into a ball and drop pieces around the base of the pan, and then press it into a flat layer. I think this recipe would also be good for a fruit pizza. Please let me know if you try this, and how it turned out. I've always had rave reviews and give out this recipe all the time.
This is the recipe I have had for years. Mine calls for Mazola oil and use the Saran Wrap. The crust is wonderful
Can i sub out oil for butter?
Hi Tophanique, I only use oil. I can assure you that you will still get a flaky crust. If you are looking for more of a butter flavor, you can add a tad bit of butter extract to this (can be found in the spice aisle where the other extracts are located). 🙂
You can also find a butter flavor anywhere you can find Wilton supplies – WalMart, Michaels, etc. I use it in my wedding cake frostings, and it is clear. It might be a better buy, value wise, than purchasing it in the spice aisle.
Thanks for this quick and easy recipe, my husband favorite pie, pecan, may get made more often now!!!!
Let me know how it turns out for you Sandy! Hope you love it!
My dad always used this recipe for pie crust…I have my own recipe that I always go to and after reading the recipe it brought back so many memories of him bragging about how good his crust was. He passed away 7 years ago and I had totally forgotten about that recipe…think I may be baking a pie this weekend. Thank you for allowing me to remember and use this recipe!!
As Beth Howard of The World Needs More Pie says, "Pie is not about perfection."
If I ever made a perfect pie crust, I'd be afraid to eat it.
Ooo…so excited! First time ever I made a decent pie crust. Some folks are born bakers and everything they touch turns out perfectly. Maybe I’m just stupid but it never has for me until now. Thank you SO much for this recipe. Everyone raved over it and wanted the recipe! Of course I sent them to you. Love your site Brandie. Thank you for sharing these easy recipe for those of us who want to make good food but don’t necessarily have the time (or the skills – ha!) to make them. But you still make us look like experts!! Love!
Dampen cabinet top (to keep the waxed paper from scooting around) and roll the ball of dough out between two sheets of waxed paper. Much easier than trying to work it out to shape in pan.
I am so excited to try this. My body can't process fats like the butter or crisco and I really wanted to make a pie. I think I might be able to eat pie again. Thanks so much!
Prebaking instructions: For a prebaked crust, you would need to poke crust with a fork, all over the inside of the crust (so it doesn't puff up too much while baking). Or if you have beans, you can line your crust on top with foil and then put beans inside to weigh it down to keep it from puffing up. Then bake at 400F degrees for about 10-15 minutes (maybe a tad longer). It should be golden in color. Hope that helps!
Coming your way from Mary at Sweet Little Bluebird. This looks like just the recipe I've been looking for!! Yay!!
Easy
This recipe is just as easy to mix everything in the pie pan. No need to grease the pan.
I am sure going to be using this recipe..I really like to make my own pie crust but don't do it often But I will now after seeing this post.. Thank you so much for sharing!!
I can tell you right now this is going to be my favorite pie crust recipe! I love to make my own pie crust but don't do it often..Since you've posted this I will.. Love it and thank you for posting it
What is AP flour? Also…Did I miss how to do a top crust for this? Do you just crumble it over the filling?
AP would be All -purpose 🙂
This recipe is for a single pie crust. If you want a top crust, then you need a double pie crust recipe.
She was talking about the picture where the crust was used for the Butter Crumble Apple Pie.
What temperature and how long do you bake pie shell? Didn't see in recipe.
I make a pie crust that is so similar to your recipe. It's the best.
2 cups AP flour
1 1/2 tsp. salt
Add to a measuring cup, but do not stir:
1/2 cup vegetable oil
1/4 cup milk
Pour all at once into flour mixture. Stir just until combined.
Roll out between two sheets of waxed paper.
It's perfect all the time!
Thank you so much for this pie crust recipe. I have avoided homemade pie crusts for years, but I really wanted to make a homemade pie crust for my Big Mom's sweet potato pie. I tried your recipe this afternoon and it worked! The crust tasted delicious, light, and flaky. I still need work on making the sides look pretty, but the taste is dyno-mite!
I can't wait to try this pie crust recipe, LOVE all your recipes!
One question, What time/temp would you use for pre-baking this crust?
Thanks a bunch..
So happy you like this one!
Thank you for this wonderful recipe! It was direly needed, believe me!
I'm all in favor of simple. I make an olive oil and buttermilk crust that's as easy as this and perfect for savory tarts.
No more Crisco messes! Yay! I'm so excited to try this in the fall! Thank you! I never used a rolling pin anyway, but this means Crisco is for cookies only now. Yay!
Oooh this looks nice and easy. Would you add a little sugar to the dough if you were making a sweet pie?
Yum! That looks beautiful & so easy! Not that a rolled crust is difficult, but I really do hate rolling them.. haha.
Thanks!
Thank you! I've never tried to make a pie crust but I'm going to pin this one and give it a go next time I make a pie!
Have you ever tried to make the crust with melted butter? I have a thing for butter in the crust, guess I can try it.
I tried your Salisbury Steak Recipe and it is to die for!!! It will become a regular here.
Yum yum…oh how I LOVE this!
I always find it difficult to make a good crust, so I just buy it (shame on me:))
I found this on Pinterest this morning, and ran out to my local farmers market to get strawberries to make strawberry pie, I am so excited! Thanks for the recipe! It worked perfect!!
I got this recipe from my mom who got it from her mom, that goes back at least 75 years! If you want to roll it out, use two sheets of wax paper. After it is rolled out, loosen the top sheet and replace, then flip and remove the bottom sheet. Use the loosened sheet to lift, flip and place the crust, then just pull it off. I use this crust for all kinds of pies including meat pies.
just enjoy all comments. Thanks so much
Great tip!!
I LOVE your blog and all your recipes, yep I am a facebook follower also, I do have a question about the crust I see you are using all purpose flour….as opposed to using self rising flour, is it all purpose flour that is the trick to making the crust?? I have tried some things before that I seen had all purpose flour, and because I would generally use self rising since that is what was in my pantry…I would love to know when is it Essential to use all purpose flour?
Hi Bluegrass, self rising flour has other ingredients in it so you can cut back on the ingredients you must add. However, these ingred.( baking soda, baking powder, etc) are not needed for pie crust. Bread flour uses several different grains so as to combine their proteins for better, finer textured bread. All purpose flour is just that, used for most purposes. Simplified. While this is not complete info, I do hope it helps.
Brandie, this is perfect! I can make a pie crust but it always looks ugly and when I try to fix it, well, lets just say I don't make a lot of pies, lol. Can't wait to give this a try. Pinned.
I have never made a proper homemade pie crust. Ever. I made this and I am SO proud of myself. I am not a great baker and I rarely make things like this. But I did it and it was GOOD! Thank you so much Brandie. Honestly. Thank you! You made me feel like a superstar this weekend and not feel bad because I’ve never made a decent pie crust in my life. LOL.
I love how easy this looks! Maybe I'll make pie more often now that I've found your easy crust recipe. Pinned!
Have a great week! 🙂
I am totally addicted to your blog!! Being a busy mother/grandmother/chief cook and bottle washer (LOL)..it helps to have someone out there that can share tips and recipes to make my life a little easier. After being diagnosed with fibromyalgia last year,it's been a little difficult to have the energy and enthusiasm that I once had, but your blog makes me smile and gives me that little "umph" to get busy! Thank you and God bless…
Lisa, I totally agree. I have Sjogrens Syndrome (sister to Lupus) and Fibro and most recipes are too complicated and time consuming, making cooking/baking almost impossible these days. Since I've discovered this blog, I'm addicted! It takes complicated and makes it much more simple and they don't take forever to prepare. So Country Cook, thank you, for finding short cuts that still produce wonderful food but don't consume all my energy. God bless you and keep those recipes coming. Thank you so much.
I want to ask what medication you are on with the Sjogrens Syndrom.
I also have this and find it can be very debilating at times.
Thank’s.
I’m very excited to try your pie crust recipe.
Would love to also try the apple pie.
I really love your blog.
Now that is a crust even I can get with..thank you for sharing it with us all. Btw, since I've discovered your blog, I can't stop reading it. I love the simplicity of your recipes, the ease of how they come together especially for a full time working mother and wife, girl scout leader ect and how delicious they are..Keep 'em coming. Now that apple picking is under way in the Hudson Valley, NY, this pie dough recipe will come in handy!! Pls. share that apple crumble recipe asap. lol
Jackie
Lisa, it just depends on what you are filling it with. Apple Pie – no. Strawberry Pie – yes. For recipes that call for a pre-baked pie crust, you will need to prick the crust with a fork so it doesn't puff up like crazy while baking. Hope that helps!
Thank you!
Do you have to pre bake the crust?
You only bake the crust blind if you are using a cold or pre-cooked fillling.
What do you mean by the word blind? I am making a homemade chocolate pecan pie(2). So I am thinking not pre-cooked??
Blind baking is when you pre bake the pie shell and usually use pie weights while pre baking it. But since you're making pecan pies and they usually take a long time to bake you do not have to pre bake your pie crust.
Oh Lisa ((hugs)), you bless me with your kind words. My own Momma has fibromyalgia and I understand the challenges of "energy" since I have a lupus-like autoimmune disorder and my joints give me troubles some days along with no energy. It lifts me up to know that these recipes make it just a bit easier for busy folks. Thank you for taking the time to comment.
Mamamia – hope you like this crust recipe and thank you so much for pinning!
Will this recipe work if I want to roll it out to make the strips for the top of a minced meat pie?
Thank you so much Jackie! That really means the world to me to hear! The Apple Pie recipe is coming up on Wednesday. I hope you love it if you give it a try! 🙂
Do you bake this crust first then add the pecan filling and bake again or do I make the crust then add the filling and bake. All at once
Bruce, Always add ingredients to rolled out pie crust and then bake.
Can you roll this wham bam pie crust? Instead of paying it?
Of course you can! 🙂