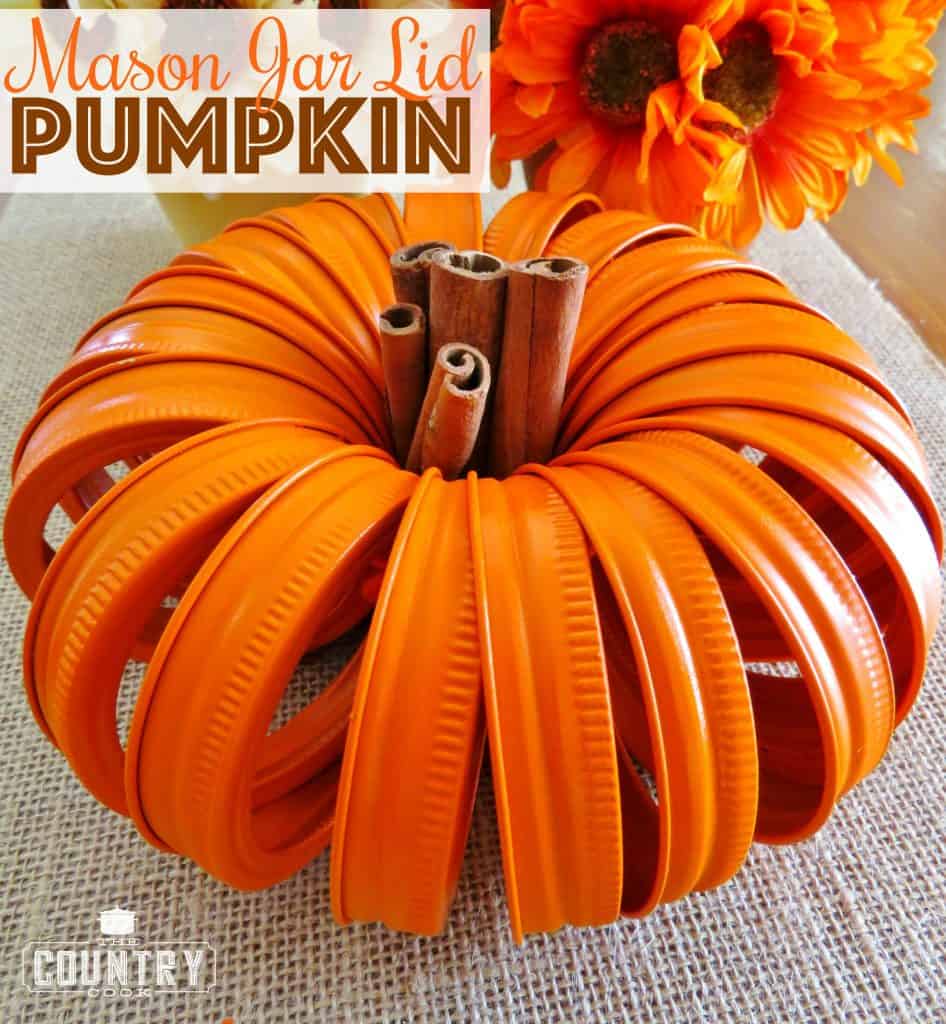
Mason Jar Lid Pumpkins
Mason Jar Lid Pumpkins with Cinnamon Stick stem makes the cutest fall centerpiece. It is easy to make and you only need lids and spray paint!
MASON JAR LID PUMPKINS TUTORIAL
This craft is probably one of my favorites. I have made many of these over the years and each year, as I decorate for fall, I love bringing them out and freshening them up with new cinnamon sticks.
A FUN FALL CRAFT
Mason jar lids are inexpensive so this is an affordable craft. Or, if you can find some old lids that you already having laying around – even better. You can sometimes pick them up in bulk at thrift stores.
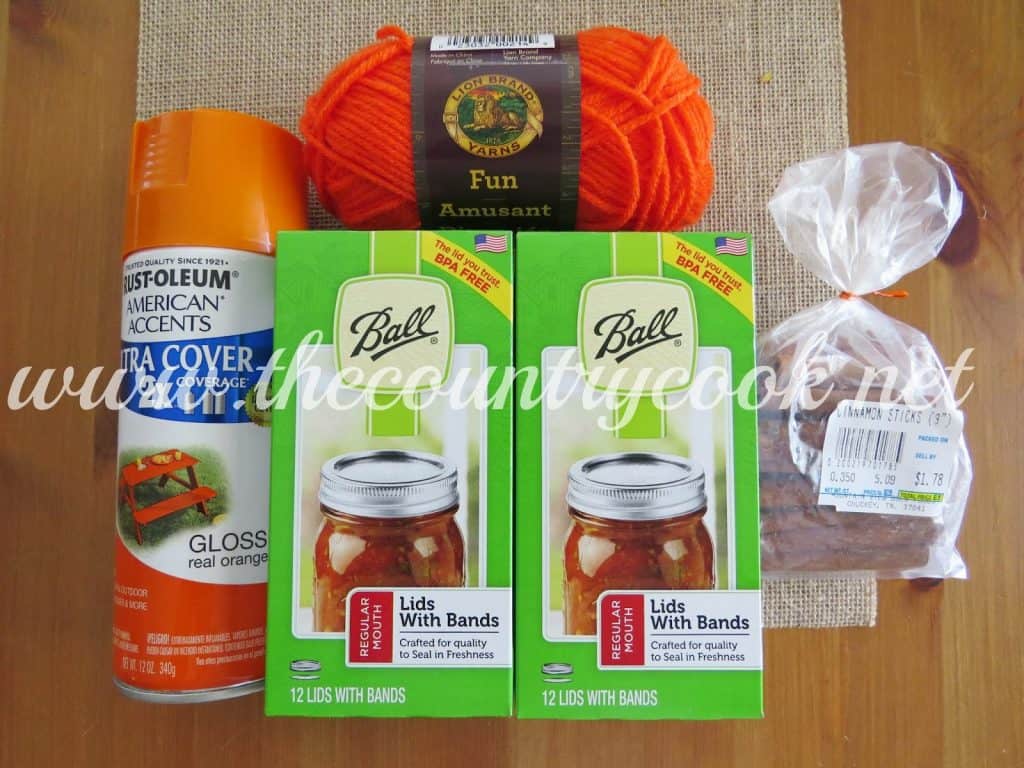
ITEMS NEEDED:
- mason jar lid bands
- orange spray paint
- orange yarn
- cinnamon sticks
HOW TO MAKE MASON JAR LID PUMPKINS:
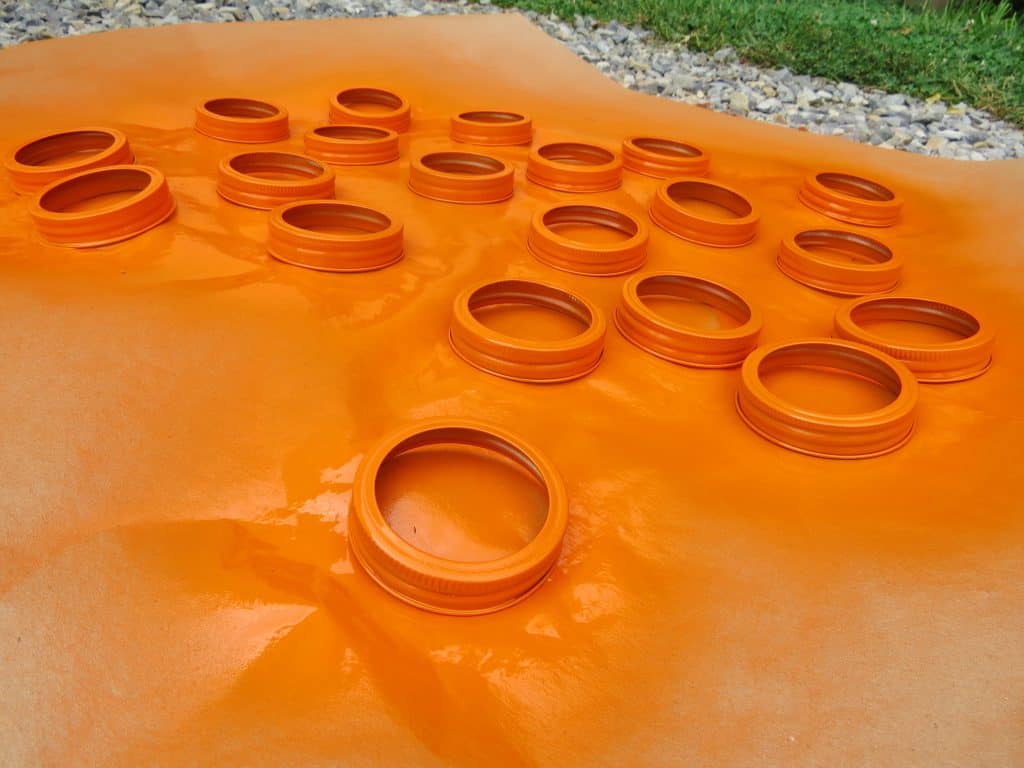
Lay out some newspaper or craft paper in a well-ventilated area. I did this outside, which really offers the best ventilation, and on a day that is not windy or rainy (obviously). Lay out all your mason jar bands onto the paper, making sure several inches separate them. Note: if you are sensitive or have respiratory issues, I also recommend wearing a protective mask while spray painting.
Spray paint the bands well with orange spray paint. I spray painted one side first, allowed to dry for a few hours, then I flipped them over and sprayed the other side. Make sure you are spraying the sides well too. Allow lids to dry completely overnight.
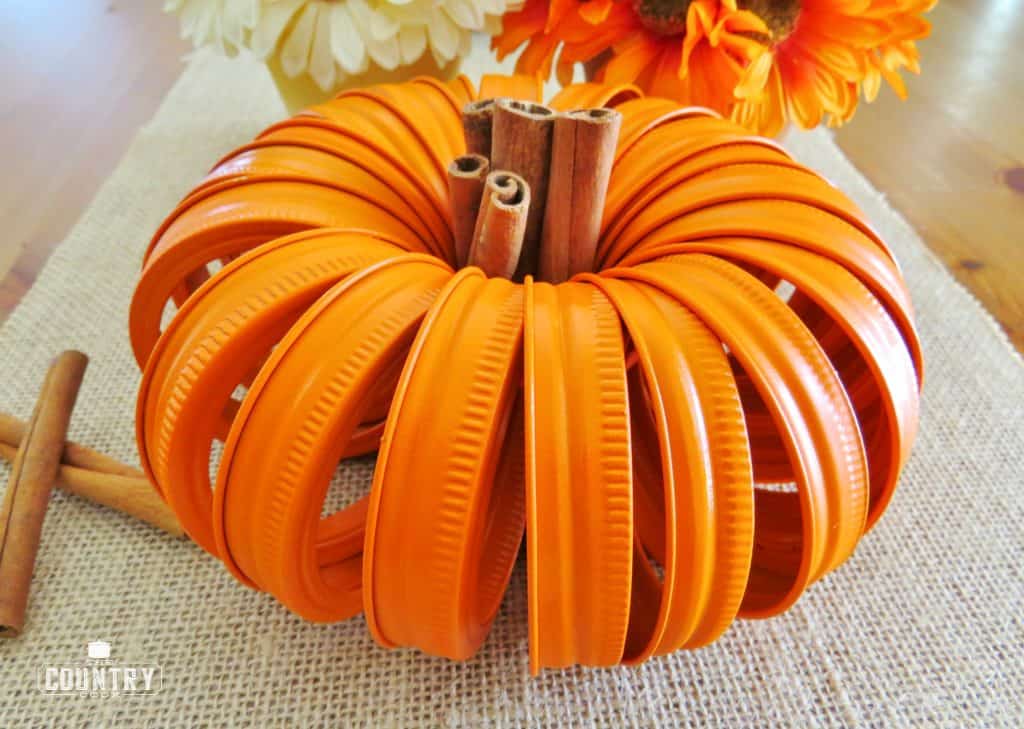
Once lids are completely dry, it’s time to tie them all together. First, make sure all your mason jar bands are facing the same direction. In the picture below, you’ll see the groove part of the bands are all facing one way. *This really is important to get this pumpkin to fan out nicely.*
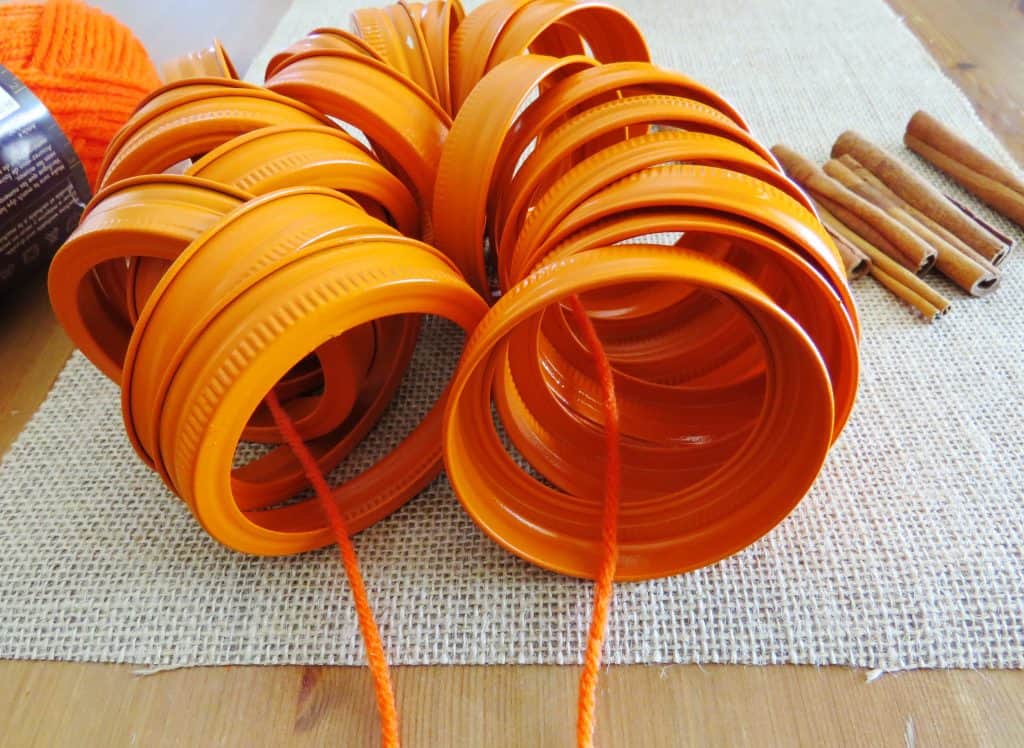
Wrap a piece of orange yarn through the bands. Then pull as tight as you can. You want a really nice, taught string. It may help if you have someone helping you on this part. My son put his finger on the string to keep it in place so I could tie a tight knot. *This is another important detail to ensure this pumpkin shapes up properly when fanning out the lids. *Cut off any excess string.

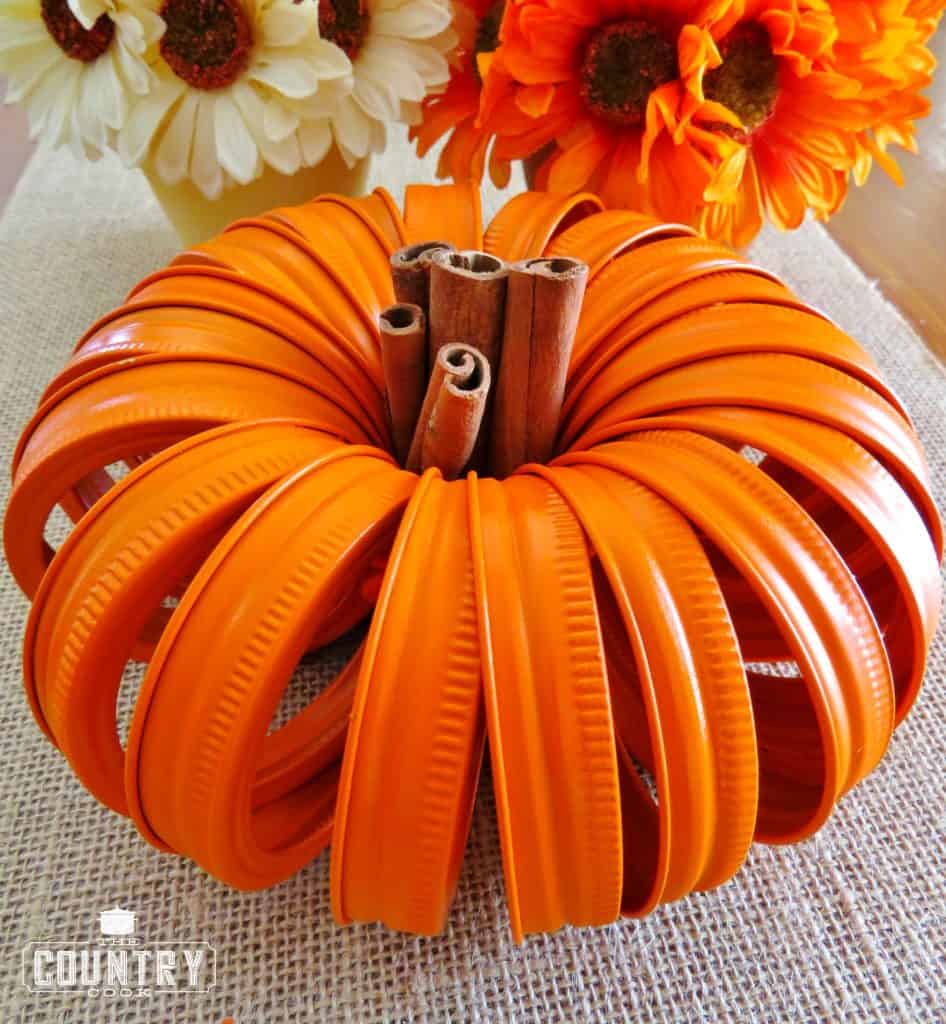
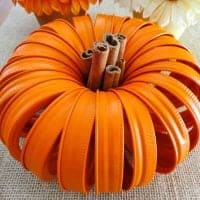
Once you have it tied, it should just be a matter of gently separating the lids so they are spaced evenly.
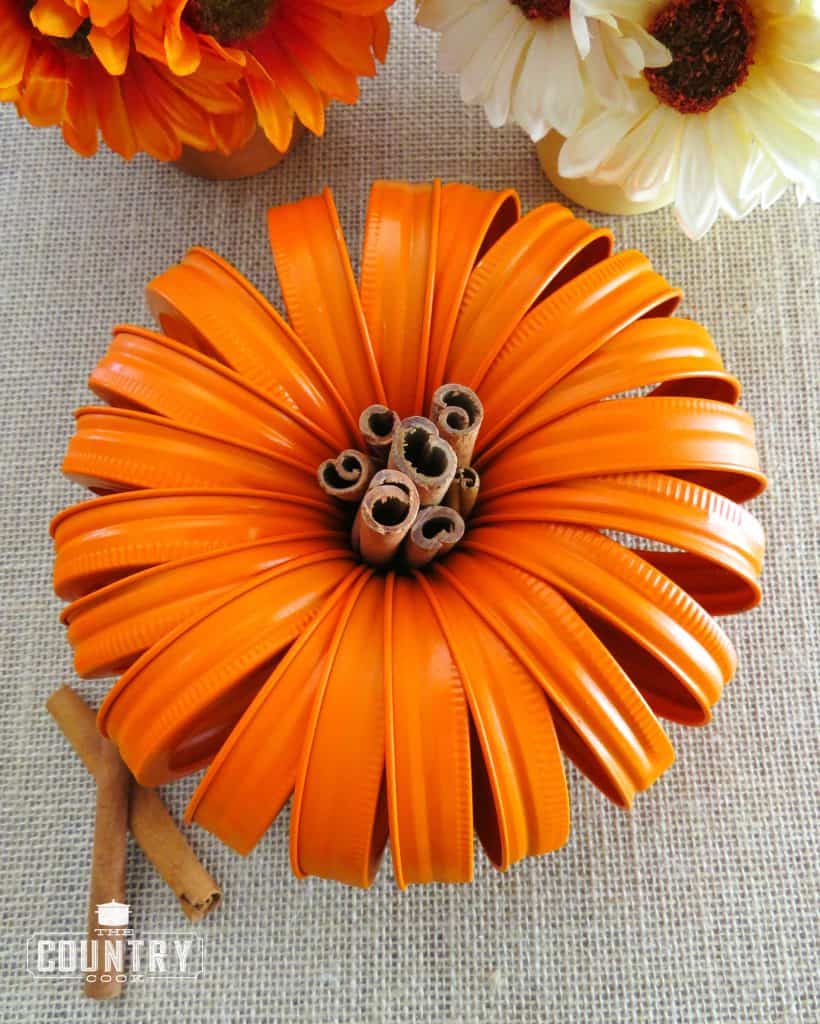
Pop a few cinnamon sticks in the middle to be the pumpkin stem and you are done! It may take 5 or 6 cinnamon sticks per pumpkin you make. It just depends on how wide the sticks are.
Mason Jar Lid Pumpkins
Ingredients
- 20 mason jar bands
- 1 can orange spray paint
- orange yarn
- 4-5 (4-inch) cinnamon sticks
Instructions
- Lay out some newspaper or craft paper in a well-ventilated area.
- I did this outside, which really offers the best ventilation, and on a day that is not windy or rainy (obviously).
- Lay out all your mason jar bands onto the paper, making sure several inches separate them.
- Note: if you are sensitive or have respiratory issues, I also recommend wearing a protective mask before spray painting.
- Spray paint the bands well with orange spray paint.
- I spray painted one side first, allowed to dry for a few hours, then I flipped them over and sprayed the other side. Make sure you are spraying the sides well too.
- Allow lids to dry completely overnight.
- Once lids are completely dry, it's time to tie them all together. First, make sure all your mason jar bands are facing the same direction.
- Wrap a piece of orange yarn through the bands then pull tight and tie a double knot.
- Cut off any excess string.
- Once you have it tied, it should just be a matter of gently separating the lids so they are spaced evenly.
- Pop a few cinnamon sticks in the middle to be the pumpkin stem and you are done!


Beautiful
Thanks so much Angelina!
Love this
I love it!! I’m sure going to try making this one.
Hi Faye – a lot of folks have mentioned that using a ribbon is easier than using string. Let me know how it turns out for you!
Love this idea as thanksgiving is a favorite Day!
This is a great instructional tool… Thank you!
Thank you Kat! I always appreciate the feedback!
I am having problems with the paint flecking off the lid. I have tried 2 different primers and 3 different sealers over the paint still no success
Thank you for your post!!! I’m making these for gifts for my family! I got all the rings painted & put my 1st one together & it’s perfect! Only question… my paint flaked off a bit in spots. I will retouch-no big deal, but do you ever have this problem?
Thanks for the exactly count of rings to use. I tried this four (very frustrating) times before I found your step by step directions!! Twenty is the magic number.
Glad you were finally able to make it without frustration. Perfect fall decoration.
I am having trouble making my lid appear as one circle.
I have retied the lids three times. I still get a gap where I tied. Getting frustrated, please help
This is just the cutest thing I have seen! I’ve gotta try it out and since I have tons of mason jar’s this is just a perfect way to use them up.
Hope you love it! Definitely a great project for all those lids ya got hanging around!
I used craft paint. I’m wondering should I put a clear top coat over the paint. To keep the paint from coming off and to make it last longer.
Can’t wait to see the finished product
Marie, I would say yes since you used craft paint. It will help it to stay on longer! 🙂
Do you think a zip tie would work better than yarn? I LOVE this idea, but would like a more "sturdy" option.
Do you know the dimensions of the finished project with the wide mouth lids?
Do you have to use 20 kids or can less be used to maybe make smaller pumpkins?
you are awesome kiddo, so talented and simply creative.
I used ribbon instead of paint on my mason jar pumpkins. I cut my ribbon the length to fit around each lid, applied a very thin line of school glue to one edge of the entire top length of ribbon and rolled it around using the lid ridge as my guide. I used 3 colors of ribbon, Orange, white and a sequence gold (which really gave it a Cinderella look!). I strung them up in this order; Orange, gold, Orange, gold, white…and to thicken my cinnamon sticks I tied 4 sticks in a bundle with jute, then used orange ribbon on top of the jute for thickness. This gave them a snug fit when pushed sticks were pushed into the center. I also added white and gold ribbon (desired length) to the center stem for a pretty fall off the pumpkin. I found that 15 small rings to be perfect or 20 large rings.
I have a question. I'm planning this for a craft night and I have 24 women who would like to make this. So my questions is how much cinnamon sticks should I get. I know each pumpkin needs 5-6 sticks. It's cheaper to buy in bulk so would you think I need 1,2, or 3 pounds of 4" cinnamon sticks?
Now that pumpkin season is upon us again and mason jars are all the rage, and easy to find in many stores, this craft idea is on my list!
I am trying this but used newspaper to lay them on and they stick to the paper. Also, I plan on using old bands that are a little rusty do I need to sand them and then use a primer before actually painting them?
This is so beautiful! It is the perfect gift for someone who has everything. I just have one question. I am allergic to cinnamon. What would be best to us in place of the cinnamon sticks?
You could use twigs from your yard or even twisted up pipe cleaners.
I'm a little confused with the picture right after the painting of the lids. you mention to make sure that all the lids are pointing in the same direction but it seems that the first 4 on the left are facing opposite the rest. Are we to follow this as well? I plan to make these this week so your comment would be greatly appreciated. thanks so much..these look adorable.
I love the pumpkin and plan to make it but I also found how to purchase just the bands(rings) and thought I would share the link to help others like me…..https://www.lehmans.com/p-4784-bulk-canning-bands-regular-mouth.aspx?show=all
You are a genius !!!! Super cute ,would make a great gift too , thanks for sharing!!!
Thanks for this wonderful idea i am having a fall themed wedding and had no idea what to do with the leftover lids/bands from the mason jars i am using. I will enjoy this new project and will add it in to my yearly fall home deco. You Rock!!
Just another option, I first saw this at a friend's home. She hadn't painted the bands and they looked beautiful. It's possible to use the "pewter" look, the gold/brass color or a mixture. I preferred this to the painted look. I really enjoy white pumpkins and would like to see how this would look with white bands but I'm so impressed by the upainted look that I'll probably just stick with that.
Really cute! I think I am going to make a few of these for gifts. I do have a question, how do the cinnamon sticks stay inside the pumpkin? Thanks!
Hi Brandie, I just love all the great idea's you have. Thank-you for sharing them with everyone . I am 83 but still love doing craftsI am going to make the pumpkin. It is soo cute.
Brandie, I believe you have discovered the gift God gave you. You use it well with the step by step instructons and pictures. God bless you dear.
That is so cute-thanks for instructions on how to make. I am 74 and still learning new things.
I'm thinking I'll have to make a wide mouth orange pumpkin and a cream/white regular mouth pumpkin. And maybe a glitter one, too. These are so cute! Thanks for the inspiration!
Since I wrote my first "comment" I have learned there is, "in fact" ,a larger size "Band with lid" that is called "WIDE MOUTH" and the smaller one is "Regular"…so the size in the picture I think is the WIDE One…maybe that should be added to Instructions. Now I need to find 5" cinnamon sticks…wish me luck!
{{{Hugs}},
Kathi B.
Warner Robins, GA
Hi Kathi! It might be hard to see from my items picture above, but I used regular lids for this. However, I just talked to a reader over on Facebook and she made them with some wide mouth lids she had and it turned out great. It just makes a bigger pumpkin so the bigger one is next on my list to try!
reallllly neat idea!!!!
Brandie! These are adorable and I have tons of old mason jar lids from canning in a bag that have a few rust spots on them. This will be perfect! I can make these this week!
Kelli, those would be perfect for this. Regular or Wide Mouth work great!
Brandie, Think this is a precious idea~ I picked up a couple of Regular Mouth, Lids with bands today. What is the size of the pumpkin supposed to be? For some reason I thought it was larger than the bands that I bought. Do bands come in different sizes? As you probably figured ut by now, I don't can or "put up fruits or veggies". Any info is appreciated.
{{{Hugs}}},
Kathi B.
Warner Robins, GA
Wow Brandie! You've done it again, amazing the rest of us w/your very detailed step-by-step tutorials. I LOVE that pumpkin and you made it look so easy! It is just too cute! Thanks again for sharing.
Tanya
Such a crafty and cute idea, I think I have collected enough lids to make this happen!
This is perfect for the holidays and looks so easy. I love crafts as long as it doesn't take all day to put it together.
Thanks for sharing!
Happy Fall!
Sharon
I LOVE THIS! I believe I have enough lids to make one too…just gonna have to get some paint…and then get my craft 'on'. Just adorable…a new project to me. I like these kind that don't take long. Thanks for sharing.
I LOVE IT!!!! think over the weekend i'm gonna try it out!!! I love doing crafts & finding things that are different. Thank You so much for sharing 🙂
This is seriously so adorable!!!
Thanks Julie! I am continually amazed when a craft actually turns out for me! Ha!
Brandie – these are SO cute! You are so creative!
Adorable Brandie…your recipes will keep on giving year from now with those students! I have recipes that I use from my home economic days still today. So proud of you 🙂
Thank you Kay! That was such an amazing blessing to hear. I had no idea and had never thought this blog could be used in that way so I was so thankful when she reached out to me to tell me about her class. It would be a huge honor and joy to know these kids are still making these recipes years from now!
I recently sorted through my lids to take out the dented and rusty ones. I plan on using them for the pumpkin. We also have a great Amish thrift store that sells used lids by the dozen. I think I'll head up there soon and see what she has laying around. Do you have any ideas for crafting with the lids? I have vintage Bernardin lids from 1976 that are printed with a farmer and corn stalks. I'd love to do something with them other than the obvious wreath.
Love the home ec story and your blog. Thanks, Beth
Perfect! Yes, I have a bunch of old ones myself that had started to rust and I ended up using some of those too. I bought the above boxes just to get an idea of current price, etc. But I definitely recommend using those older, used lids for this craft if you have them. I love that you have some vintage lids. I bet those are gorgeous!
i love this i have been looking for the perfect centerpiece..i found it thank you for sharing..gonna try to make this… have a blessed day..
Thanks so much! You can also use the wide-mouth bands for this if you have those too! It will just make a bigger pumpkin 🙂
I wonder how many smaller and larger bands you would have to use, to make a group of all sizes for a table setting?
You can also use this method to create snowmen or Santa Clause. Just paint them white or flock them and add a styrofoam head.
Very cute idea! Thank you!