Homemade Pizza Dough
This homemade pizza dough makes a crispy exterior and bottom. It holds up perfectly to toppings. It has a great chew that you want in a good pizza dough!
Just Like Your Favorite Pizza Place
Years ago I was hesitant about making anything with yeast. It was intimidating and just seemed like a lot of work. All that kneading and waiting for stuff to rise. But I decided to conquer that fear because of my love for all things yeast-y. I think working with dough is a lesson in patience. Also, there really is nothing like a homemade pizza dough. It can truly make or break a pizza!


My favorite pizza crust recipe! I have tried other variations but keep coming back to this one because it works every single time and is a family favorite. Thank you!
– Elizabeth
Tips For Making Pizza Dough:
- Two good rules for working with yeast that I have learned: have active yeast and knead dough until smooth and elastic. That is really the basics right there. I buy a jar of the yeast and I store it in the fridge. Doing that keeps it fresher, longer.
- You want to get yeast that is still active. Check the expiration date on the package.
- If you have a bread machine, this recipe works great in one. Just put all ingredients in your bread machine (add the wet ingredients in first.) Put bread machine on dough setting and allow dough to rise. Once dough has risen, take out and continue with the rest of the recipe.
- This dough makes a crispy exterior and bottom, it holds it really well, nothing floppy! It also has a great chew that you find in a good pizza dough.
- For a more “chewy” dough, try using bread flour. It has more gluten and therefore will will produce a softer, chewier dough.
- This dough can be used for more than traditional pizza. It can be used to make garlic breadsticks. You can also use it to make a sweet pizza, like my Apple Dessert Pizza.
- You must try this pizza dough with my Homemade Pizza Sauce.
- This recipe makes two 10-inch pizzas. If you only use one dough ball, just wrap up the other dough ball in plastic wrap and store in the fridge. Use that other dough ball within a week. Dough cannot be frozen.

Ingredients Needed: (See Recipe Card Below For The Full Recipe)

How To Make Homemade Pizza Dough:
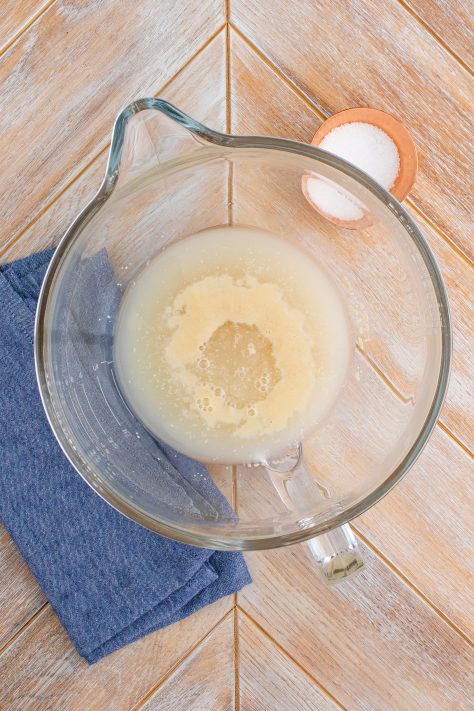
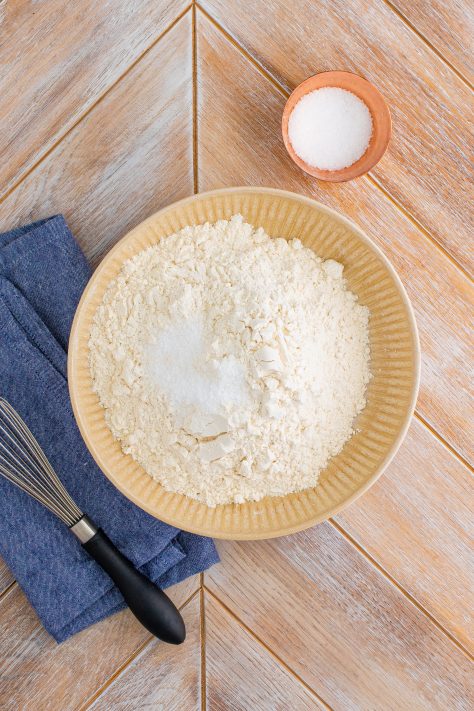
Place the warm water, yeast, and sugar into the body of a stand mixer with the hook attachment. Stir to combine and let it sit for about 5 minutes until a bubbly foam forms on the top of the water. While the yeast is activating, place the flour and salt into a medium-sized bowl and whisk together until combined.

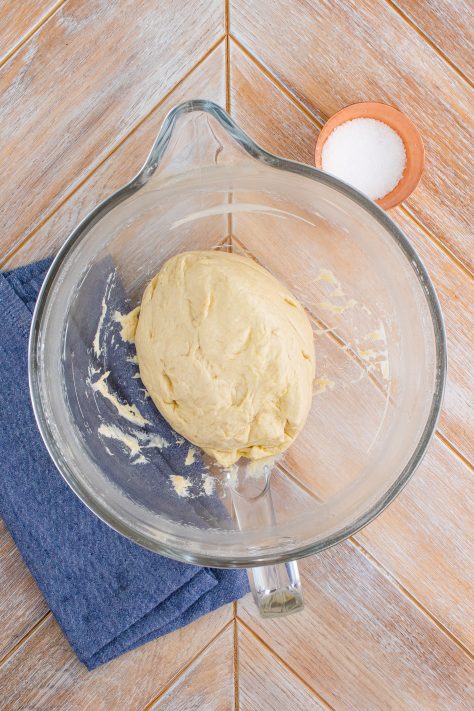
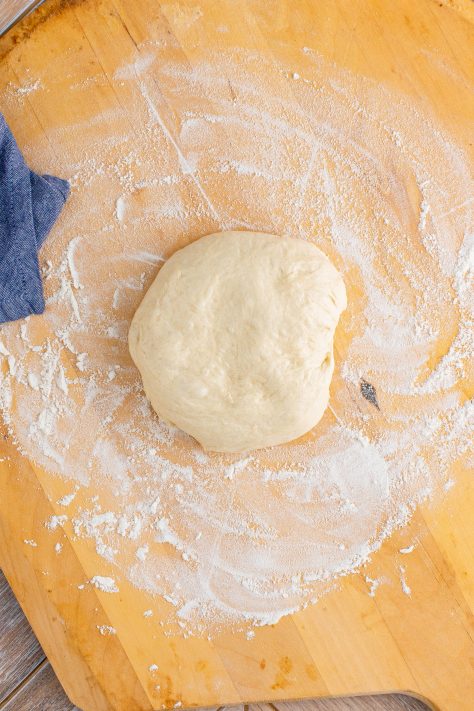
Once the yeast is activated, pour the flour mixture into the bowl. At slow speed, stir the flour mixture and yeast mixture together until a dough forms, scrape down the sides as needed. Crank the stand mixer up to medium-high and knead the dough for 5-7 minutes. The dough will form a smooth ball. If the dough sticks to the sides or bottom of the mixer while you are kneading, add a small amount of flour at a time, about 1 Tablespoon at a time until it no longer sticks. On a clean work surface lightly dusted with more flour, knead the dough a few times to form a ball. Place the vegetable oil into a large bowl and grease the sides with the oil.

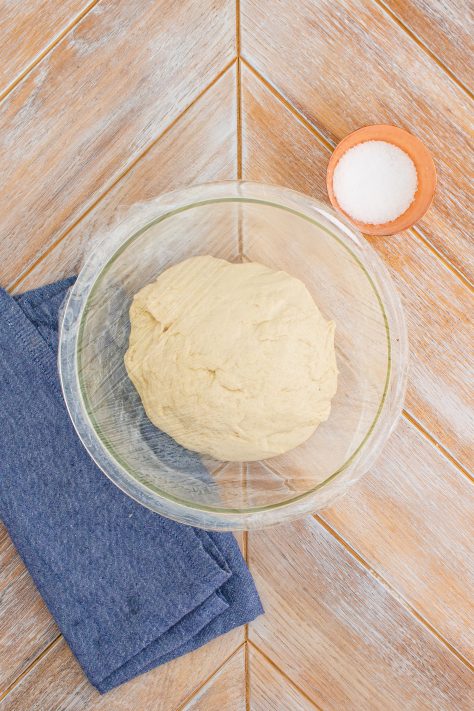
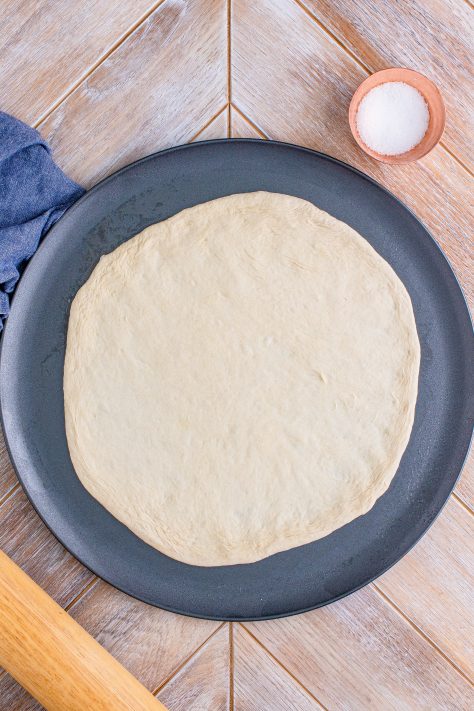
Place the dough ball into the bowl and roll it around in the oil so it is coated. Cover with plastic wrap and let the dough sit and double in size. About 90 minutes or so. Preheat the oven to 450°F. Lightly grease a pizza pan with cooking spray and set aside. With your hands or with a rolling pin, take half of the dough and place it on a lightly floured clean work surface and roll it out into a 10-12 inch circle. Place the dough on the pizza pan and stretch it out to about 10-inches wide. Add pizza sauce and toppings of your choice.

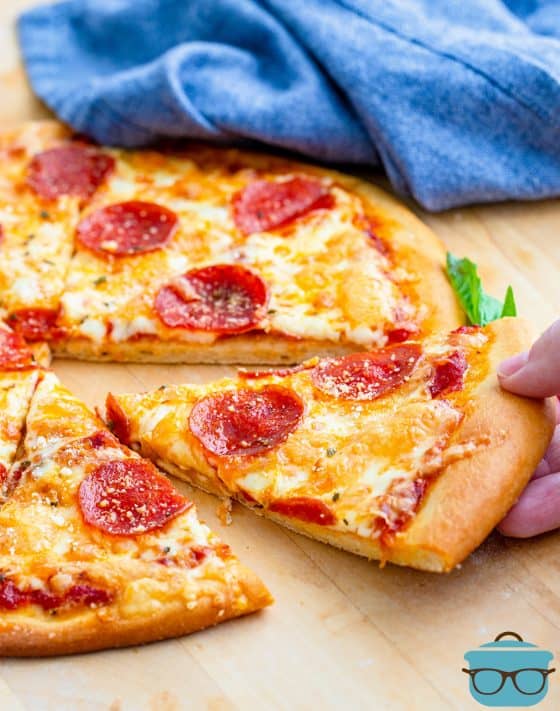
Place into the oven and bake for 12-15 minutes until the cheese is browned and the crust is golden around the edges. Optional garlic butter: In a small bowl whisk together the melted butter and garlic powder. Using a pastry brush, brush the pizza crust as soon as you take it out of the oven.
Craving More Recipes?

Homemade Pizza Dough
Ingredients
- 1 cup very warm water (110°F)
- 2 ¼ teaspoons active dry yeast (1 packet)
- 1 teaspoon granulated sugar
- 3 cups all-purpose flour
- ½ teaspoon kosher salt
- 2 teaspoons oil (olive, avocado or vegetable oil)
Optional garlic butter:
- 1 Tablespoon unsalted butter, melted
- ¼ teaspoon garlic powder
Instructions
- Place 1 cup very warm water (110°F) and 2 1/4 teaspoons active dry yeast (1 packet) and 1 teaspoon granulated sugar into the body of a stand mixer with the hook attachment. Stir to combine and let it sit for about 5 minutes until a bubbly foam forms on the top of the water.

- While the yeast is activating, place 3 cups all-purpose flour and 1/2 teaspoon kosher salt into a medium-sized bowl and whisk together until combined.
- Once the yeast is activated, pour the flour mixture into the bowl. At slow speed, stir the flour mixture and yeast mixture together until a dough forms, scrape down the sides as needed.NOTE: This can be done in a large bowl by hand. It will just take a little elbow grease.
- Turn the stand mixer up to medium-high and knead the dough for 5-7 minutes. The dough will form a smooth ball. If the dough sticks to the sides or bottom of the mixer while you are kneading, add a small amount of flour at a time, about 1 Tablespoon at a time until it no longer sticks.
- On a clean work surface lightly dusted with more flour, knead the dough a few times to form a ball. Place 2 teaspoons oil into a large bowl and grease the sides with the oil.
- Place the dough ball into the bowl and roll it around in the oil so it is coated. Cover with plastic wrap and let the dough sit and double in size. About 90 minutes.
- Preheat the oven to 450°F. Lightly grease a pizza pan with cooking spray and set aside.
- With your hands or with a rolling pin, take half of the dough and place it on a lightly floured clean work surface and roll it out into a 10-12 inch circle.
- Place the dough on the pizza pan and add toppings of your choice. Place into the oven and bake for 12-15 minutes until the cheese is browned and the crust is golden around the edges.
- Optional garlic butter: In a small bowl whisk together 1 Tablespoon unsalted butter, melted and 1/4 teaspoon garlic powder. Using a pastry brush, brush the pizza crust as soon as you take it out of the oven.

Notes
- Two good rules for working with yeast that I have learned: have active yeast and knead dough until smooth and elastic. That is really the basics right there. I buy a jar of rapid rise yeast and I store it in the fridge. Doing that keeps it fresher, longer.
- If you have a bread machine, this recipe works great in one. Just put all ingredients in your bread machine (add the wet ingredients in first.) Put bread machine on dough setting and allow dough to rise. Once dough has risen, take out and continue with the rest of the recipe.
- For a more “chewy” dough, try using bread flour. It has more gluten and therefore will will produce a softer, chewier dough.
- This recipe makes two 10-inch pizzas. If you only use one dough ball, just wrap up the other dough ball in plastic wrap and store in the fridge. Use that other dough ball within a week. Dough cannot be frozen.
Nutrition
Nutritional Disclaimer
“The Country Cook” is not a dietician or nutritionist, and any nutritional information shared is an estimate. If calorie count and other nutritional values are important to you, we recommend running the ingredients through whichever online nutritional calculator you prefer. Calories and other nutritional values can vary quite a bit depending on which brands were used.
Originally published: January 2012
Updated & republished: April 2026


Very good! Turned out great and had great flavor!
My favorite pizza crust recipe! I have tried other variations but keep coming back to this one because it works every single time and is a family favorite. Thank you!
I made this recipe exactly as called for except I made one larger pizza instead of two. Absolutely perfect! So easy and my kids loved it so much. Now my go to pizza dough recipe!
Maybe you can help me….I’ve made this a few times and I keep having the same problem. No matter how long I cook it, it never gets done in the center. The crust and a couple inches in is fine but the rest of the center is completely undone. I actually burnt the crust on o e try to get the center done. Any idea what is hPpening?
Hey Cinderella! So, it could possibly be two things. Usually it’s because the crust is too thick in the center of the pizza and not enough is spread to the outer edges. Also, chances are, the toppings are too thick. For example, a lot of sauce, a lot of cheeses and other toppings. The heat takes longer to penetrate. So, a couple of tips. You should be baking your pie on an upper shelf. Try to resist opening the oven while it’s cooking. Also, you can “par-bake” the crust for a few minutes before putting on any toppings. Just a few minutes, then take it out, add your toppings then pop it back in until the outer crust is golden and cheese is melted. Hope that helps some!:)
I’m hoping you can help me. I’ve never been able to work with yeast dough. The yeast blooms, the flour mixture comes together nicely but one I start needing it never gets “smooth and elastic”. From the very first kneed it just keeps getting harder and less elastic. Like I said, it’s not a matter of over kneeding it starts to happen from the very start. What am I doing wrong. TIA
Hi Tara, this is a really tough one since it’s really hard to know unless I am there with you while you are making it. It sounds like you are doing everything correctly. The dough should get hard. The more you knead it, the harder it should get to try and knead it. That is activating the gluten. What kind of flour are you using? I love semolina flour but it doesn’t always get super smooth and that’s okay. Kept kneading until it becomes too difficult to knead anymore. How has it been baking up for you? Is it hard, chewy, soft or what?
Brandie I love this recipe! It’s easy and delicious! I’ve made it about 4 times now and it works EVERY time! Thank you for turning me on to a really much appreciated pizza crust! My husband says the same!????????????
Hi Laurie! I loved reading your comment! Thanks so much for taking the time to let me know how it turned out for you. So, so thrilled to hear it!!
I just made the dough. OMG it smells sooo good. I’m stoked for the finish pizza. I’ll let you know.
I have been making pizza dough for many years. However, I never found the perfect recipe until now. Thanks very much.
This looks like what I have been looking for…. However, I am just a bit confused about the yeast process. It was my understanding that rapid rise yeast did not need proofing . I just wanted to make sure I am to use rapid rise as I think I read 'active yeast' in your recipe as well and I became confused. I don't think they are the same. Thank you if you can clarify that for me.
You are so inspiring with all your recipes. I was the oldest of 4 girls and my Mom didn't cook much from scratch. If it didn't come from a box or package she didn't fool with it. I love to cook and try new recipes. I will be spending lots of time here gathering ideas and recipes. Bless you!
Thank you so much Riddlez. I really hope you love it if you try it! 🙂
one of the best tutorials i've seen! i'm feeling especially brave after this post; maybe i'll make some homemade dough after years of yeast intimidation!
Hi Tracy, if all you have is all-purpose then go with that. BUT, if you have a bag of bread flour (but no semolina flour) then try to use all bread flour. Bread flour brings a nice and light chewiness to pizza dough and the semolina dough adds a bit of texture which I think makes a really flavorful pizza crust. Are you a fan of Tina from Mommy's Kitchen? She has a pizza dough that is made totally from all-purpose flour and she calls it her no-fail pizza dough. Here's the link in case you want to give that a try too. 🙂 Good luck!!
I have never made anything with yeast or bread flour. Would it be possible to make this with all purpose flour? I have just started to enjoy cooking but really have no idea what I am doing. I have made several of your dishes and they were absolutely FANTASTIC!
Yep, you can freeze the dough before it rises. Just make sure you wrap it well in plastic wrap, then I would also put it in a freezer safe bag and zip it up well. When you are ready to use it, you'll need to allow time for it to come to room temperature and allow it to rise. Hope that helps!
can you feeze the dough? if so, at what stage?
Hi USA Mom!! Woo Hoo! Thank you SO much for letting me know how it turned out for you. Love hearing that you used your bread machine for it too! So happy your family enjoyed it!! 🙂
I have to admit that even though I make a lot of pizzas, I've never made my own dough. You make it look easy and your result is perfect. I guess it's time to buckle down and do it! Thanks!
Brandie, I can smell this dough from Paris! Loving it and your photos of this are just too tempting as I'm looking at this before dindins on a Friday night! That last one is a killer! Bravo on Top9!
Working with yeast dough is really magical, I smile during the whole kneading process ( not kidding! ) I've never tried semolina flour, thanks for sharing, I will definitely try it now! Congrats on the Foodbuzz top 9!
I love making my own pizza dough. I have never tried it with semolina flour – definitely going to try next time!
Congratulations on the Top 9:) Thanks for the tips on working with yeast. Geri
There is something about the smell of yeast and flour…
I'll have to try the semolina flour next time I make pizza dough. I love the idea of added crunchiness!
Brandie, your dough is PERFECT!!! I need to make homemade pizza soon! Hooray for the Top 9!
Your dough is gorgeous, as well as the pizza. Great job. Thanks for the tutorial. Next time my hubby wants pizza, we'll try this recipe.
Congrats on the Top 9 today!
Bookmarked!! Will try this the next time I make pizzas. Congratulations on the top 9!
Very very delicious looking pizza..and made from scratch even better!!! All your hard work payed off..you made it to the top 9!!! Congrats sweetie!!!
Is there a way to make this dough ahead of time and then use it the next day? Can you let it rise and then refrigerate it for the night and then shape it when you are ready to use it?
Denise, I would recommend making it, but not letting it rise. Just cover the ball with plastic wrap & put it in the fridge (it will still rise some overnight). If you've got a big bowl with a lid, oil that and put dough ball in there. The dough will actually have enough room to rise overnight. And then you won't have to do a warm rise when you go to use it. Hope that helps!
Totally YUMMYAarthi
Wonderful step-by-step! I have no experience with doughs, and I love the browned edge on your pizza 🙂
I have to say though, I can't get over that Fleischmann brand. Nothing is worse that "Meat-man" as a name for butter and bakery goods…
Look delicious!! I actually just made my first homemade pizza dough last night…it just a big harder than expected, but I've never made any homemade dough before. The end result was so yummy, but not as pretty as yours! 🙂
I'll have to use this recipe sometime with the semolina.
Blessings,
Leslie
You're making me want pizza! This looks delicious. I've not tried semolina yet, but I think it's getting added to the grocery list!
Your pizza looks amazing. I've never tried making a semolina dough but I think I might have to now. Great recipe!
Great walk through. I like to make mini pizzas with the grandkids, they get a real kick out of helping shape the pizza. Yours looks delicious.
Golly I'm hungry for a pizza right now! Yours looks so good!